

Kubernetes Core Concepts - Pods
A complete guide to understand Kubernetes Pods!

What is a Kubernetes Pod?
As per the official Kubernetes documentation Pods are the smallest deployable units of computing that you can create and manage in Kubernetes.
A pod encapsulates applications running in one or more Linux/Windows containers.
All the containers within a single pod shares following things:
- A unique network IP
- Network Namespace
- Storage volumes
- All other specifications applied to the pod
Why we need pods when we have containers?
It solves port allocation issue. With containers we can use a specific host port only once. Since a Pod works like a standalone virtual host having a unique IP the same port can be used multiple times without encountering conflicts.
What is the job of a Pod?
At a very high level a Pod is responsible to carry your application running inside within a container.
How does a pod work?
Pods are group of containers working together to process a set of desired work. When we create a Pod either using an YAML manifest file or by the kubectl command we specify the desired behavior a pod should acquit itself.
Kubernetes Controllers such as StatefulSets, Deployments and DaemonSet are responsible for creating workloads using Pods.
They manage Pods throughout their lifecycle for example while rolling out updates, scaling up/down ReplicaSets and managing their health within the cluster.
We will learn about these controllers in detail in our upcoming articles.
Lifecycle of a Pod
Pods follow a defined lifecycle, starts with the Pending state, moving through Running if at least one of its containers starts OK, and then through either the Succeeded or Failed phases depending on whether any container in the Pod terminated in failure state.
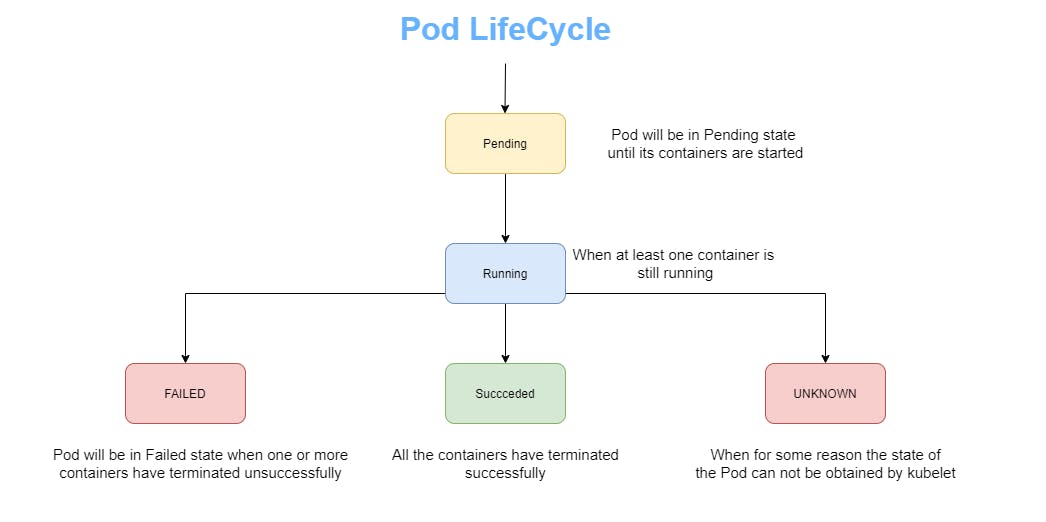
A Pod's status field is a PodStatus object, which has a phase field.
Here are the possible values for phase:
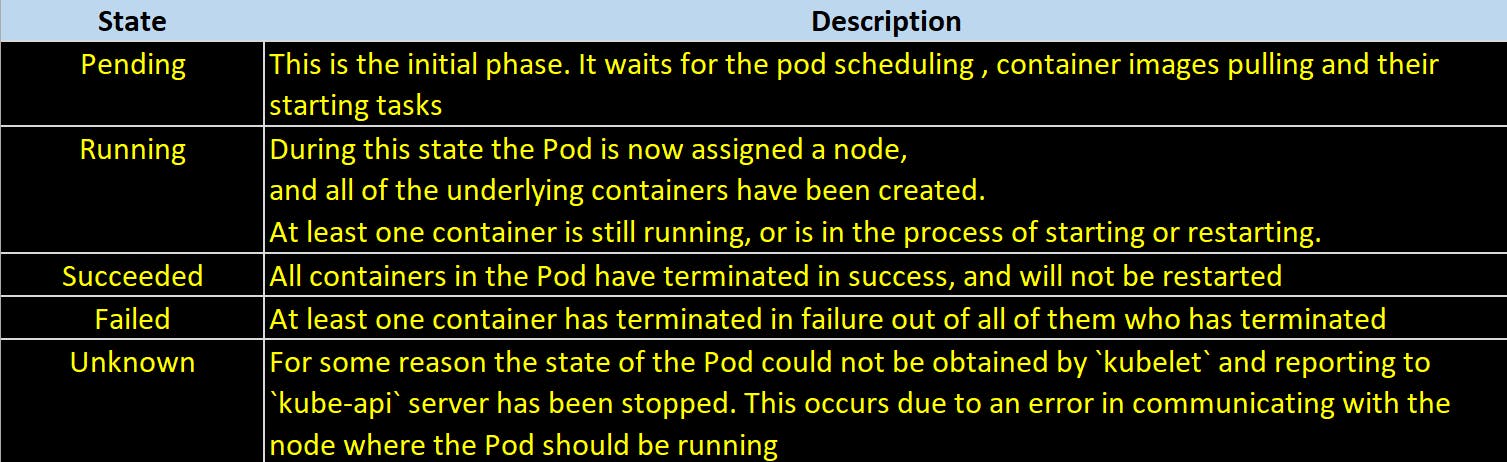
If a node dies or is disconnected from the rest of the cluster, Kubernetes applies a policy for setting the phase of all Pods on the lost node to Failed.
Pod Lifetime
Kubernetes pods are transient in nature, if a pod (or the node it executes on) fails, Kubernetes automatically creates a new instance of that pod on the node they were scheduled to run until they die or node itself goes down in order to continue operations. Each Pod will have a unique id assigned (UID) to it.
A running Pod can never be "rescheduled" to a different node as Kubernetes does not support live migration of pods from one host to another. You can always create a new identical pod.
Pods by nature doesn't self-heal. This is controlled by another Kubernetes components known as Controllers. They manage the Pods throughout their lifecycle.
Create a Kubernetes Pod
There are two methods of creating a Kubernetes Pods.
Method 1 - using kubectl command
Kubectl command controls the Kubernetes Cluster.
root@kube-master:~# kubectl run lco-pod-demo --image=nginx
pod/lco-pod-demo created
Older releases of
kubectl(version <1.18) will produce a deployment resource as the result of the providedkubectl runexample, while newer releases produce a singlepodresource.
Verify the status of Pod created -
root@kube-master:~# kubectl get pods
NAME           READY   STATUS    RESTARTS   AGE
lco-pod-demo   1/1     Running   0          61s
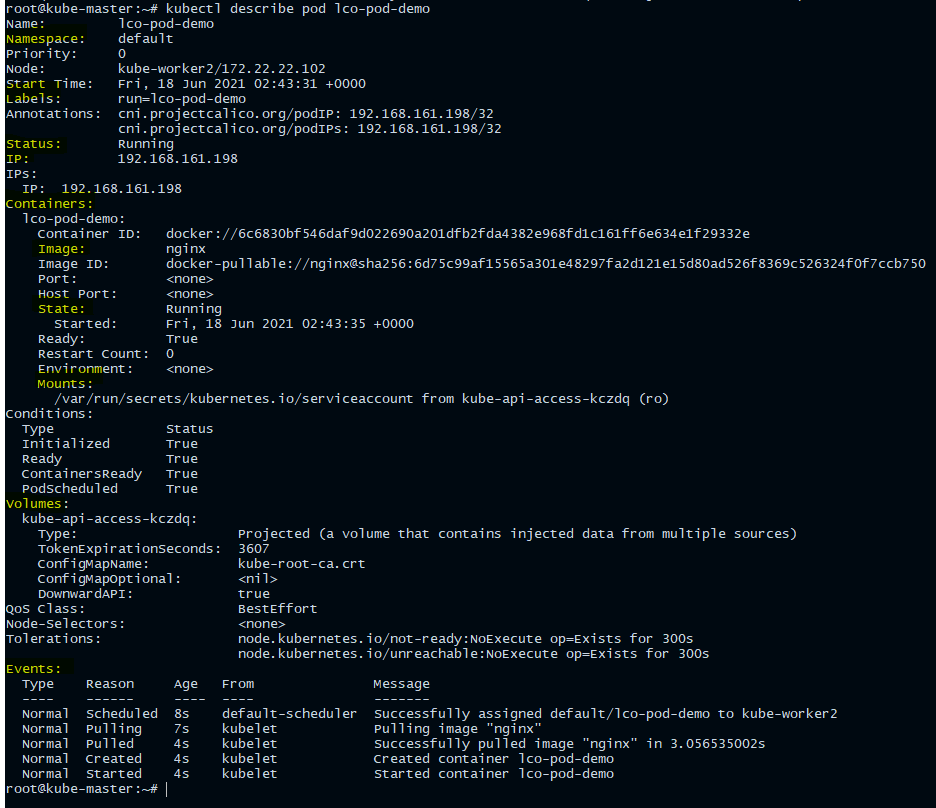
Describe the Pod created in last step to get more details about it -
Run the following command to describe the properties of the pod we created above.
root@kube-master:~# kubectl describe pod lco-pod-demo
Few fields which requires your attention here are -
StatusIPLabelsContainer specsEvents
Method 2 - using yaml manifest file
Here is our yaml manifest file which we are going to use to create a Pod.
root@kube-master:~# cat lco-pod-demo.yml
apiVersion: v1
kind: Pod
metadata:
   name: lco-pod-demo-2
   namespace: default
   labels:
     demo: pod
spec:
  containers:
  - name: httpd
    image: docker.io/httpd
    imagePullPolicy: IfNotPresent
    ports:
      - containerPort: 80
Let us understand the main parts of this yaml manifest file.

Apply and create the Pod
You can create a Pod using a yaml file by running the following command:
root@kube-master:~# kubectl apply -f lco-pod-demo.yml
pod/lco-pod-demo-2 created
Verify the status of Pod created
root@kube-master:~# kubectl get pod
NAME             READY   STATUS    RESTARTS   AGE
lco-pod-demo     1/1     Running   0          5m12s
lco-pod-demo-2   1/1     Running   0          5s
Creating Multi container Pods
At times we need to create multi container pods where a helper or side application to your main application. For example to synchronize the data when you have multiple databases pods or to backup or server the data to and from your sidecar(helper) container.
Here is our manifest file to deploy a multi-container pod.
root@kube-master:~# cat multi-container-pod.yml
apiVersion: v1
kind: Pod
metadata:
  name: lco-multi-container-pod-demo
spec:

  restartPolicy: Never

  volumes:
  - name: shared-data
    emptyDir: {}

  containers:

  - name: nginx-container
    image: nginx
    volumeMounts:
    - name: shared-data
      mountPath: /usr/share/nginx/html

  - name: ubuntu-container
    image: ubuntu
    volumeMounts:
    - name: shared-data
      mountPath: /pod-data
    command: ["/bin/sh"]
    args: ["-c", "echo Kubernetes Series from LearnCodeOnline!!! > /pod-data/index.html"]
Here we are deploying a webserver container based on the Nginx image nginx-container. The second one ubuntu-container is based on the Ubuntu image, and writes the text “Kubernetes Series from LearnCodeOnline!!!” to the index.html file served by the first container.
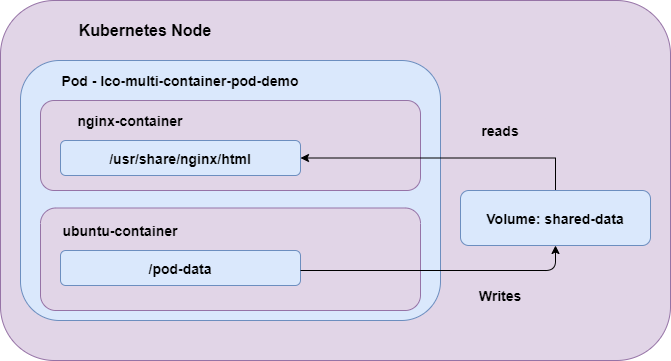
apiVersion, kind, and metadata are mandatory fields for all Kubernetes objects.
Apply and create the Pod
root@kube-master:~# kubectl apply -f multi-container-pod.yml
pod/lco-multi-container-pod-demo created
Describe the pod created above
root@kube-master:~# kubectl describe pod lco-multi-container-pod-demo
Name:         lco-multi-container-pod-demo
Namespace:    default
Priority:     0
Node:         kube-worker2/172.22.22.102
Start Time:   Thu, 17 Jun 2021 09:09:08 +0000
Labels:       <none>
Annotations:  cni.projectcalico.org/podIP: 192.168.161.195/32
              cni.projectcalico.org/podIPs: 192.168.161.195/32
Status:       Running
IP:           192.168.161.195
IPs:
  IP:  192.168.161.195
Containers:
  nginx-container:
    Container ID:   docker://573633ca42592f93cf12917c820000da588f861af10991d4ed9d06a9545fe1ca
    Image:          nginx
    Image ID:       docker-pullable://nginx@sha256:6d75c99af15565a301e48297fa2d121e15d80ad526f8369c526324f0f7ccb750
    Port:           <none>
    Host Port:      <none>
    State:          Running
      Started:      Thu, 17 Jun 2021 09:09:21 +0000
    Ready:          True
    Restart Count:  0
    Environment:    <none>
    Mounts:
      /usr/share/nginx/html from shared-data (rw)
      /var/run/secrets/kubernetes.io/serviceaccount from kube-api-access-tjzgx (ro)
  ubuntu-container:
    Container ID:  docker://29a5484fec2319d07b95ec7541780d325f698762e6e3c9c47a4b8c33c012f557
    Image:         ubuntu
    Image ID:      docker-pullable://ubuntu@sha256:adf73ca014822ad8237623d388cedf4d5346aa72c270c5acc01431cc93e18e2d
    Port:          <none>
    Host Port:     <none>
    Command:
      /bin/sh
    Args:
      -c
      echo Kubernetes Series from LearnCodeOnline!!! > /pod-data/index.html
    State:          Terminated
      Reason:       Completed
      Exit Code:    0
      Started:      Thu, 17 Jun 2021 09:09:36 +0000
      Finished:     Thu, 17 Jun 2021 09:09:36 +0000
    Ready:          False
    Restart Count:  0
    Environment:    <none>
    Mounts:
      /pod-data from shared-data (rw)
      /var/run/secrets/kubernetes.io/serviceaccount from kube-api-access-tjzgx (ro)
Conditions:
  Type              Status
  Initialized       True
  Ready             False
  ContainersReady   False
  PodScheduled      True
Volumes:
  shared-data:
    Type:       EmptyDir (a temporary directory that shares a pod's lifetime)
    Medium:
    SizeLimit:  <unset>
  kube-api-access-tjzgx:
    Type:                    Projected (a volume that contains injected data from multiple sources)
    TokenExpirationSeconds:  3607
    ConfigMapName:           kube-root-ca.crt
    ConfigMapOptional:       <nil>
    DownwardAPI:             true
QoS Class:                   BestEffort
Node-Selectors:              <none>
Tolerations:                 node.kubernetes.io/not-ready:NoExecute op=Exists for 300s
                             node.kubernetes.io/unreachable:NoExecute op=Exists for 300s
Events:
  Type    Reason     Age   From               Message
  ----    ------     ----  ----               -------
  Normal  Scheduled  29s   default-scheduler  Successfully assigned default/lco-multi-container-pod-demo to kube-worker2
  Normal  Pulling    28s   kubelet            Pulling image "nginx"
  Normal  Pulled     19s   kubelet            Successfully pulled image "nginx" in 9.395185042s
  Normal  Created    16s   kubelet            Created container nginx-container
  Normal  Started    16s   kubelet            Started container nginx-container
  Normal  Pulling    16s   kubelet            Pulling image "ubuntu"
  Normal  Pulled     6s    kubelet            Successfully pulled image "ubuntu" in 9.675380985s
  Normal  Created    2s    kubelet            Created container ubuntu-container
  Normal  Started    1s    kubelet            Started container ubuntu-container
You can see from the above output two containers got created, one is your webserver nginx-container and another one which is responsible to server index page ubuntu-container. At the bottom of the description you can see the events aka logs while creating this multi container pod.
Once you are done with Pod deployment, the first container will continue running and the second one will get completed.
Access the nginx-container with the following command:
root@kube-master:~# kubectl exec -it lco-multi-container-pod-demo -c nginx-container -- /bin/bash
root@lco-multi-container-pod-demo:/#
You will be taken to the bash prompt of the Nginx container. To make sure the second container has done its job run the following command:
root@lco-multi-container-pod-demo:/# curl localhost
Kubernetes Series from LearnCodeOnline!!!
You should see “Kubernetes Series from LearnCodeOnline!!!” printed out.
By doing this we have successfully deployed a multi-container pod in a Kubernetes cluster. This was a very basic example, but it shows how do containers interact with in the same pod.
The primary purpose of a multi-container Pod is to support co-located, co-managed helper processes for a primary application.
Delete a kubernetes Pod
There are two methods of deleting a Kubernetes Pod.
Method 1 - using kubectl command
root@kube-master:~# kubectl delete pod lco-pod-demo
pod "lco-pod-demo" deleted
Method 2 - using the same manifest file used to create it
root@kube-master:~# kubectl delete -f multi-container-pod.yml
pod "lco-multi-container-pod-demo" deleted
Verify if both the above pods are now deleted
root@kube-master:~# kubectl get pods
No resources found in default namespace.
Deleting pods is a graceful process; pods will continue running for a grace period (default of 30 seconds) before being forcefully terminated. The grace period value can be overwritten with the
--grace-periodflag if desired.
This is all about Kubernetes Pods.
Hope you like the tutorial. Stay tuned and don't forget to provide your feedback in the response section.
Happy Learning!