


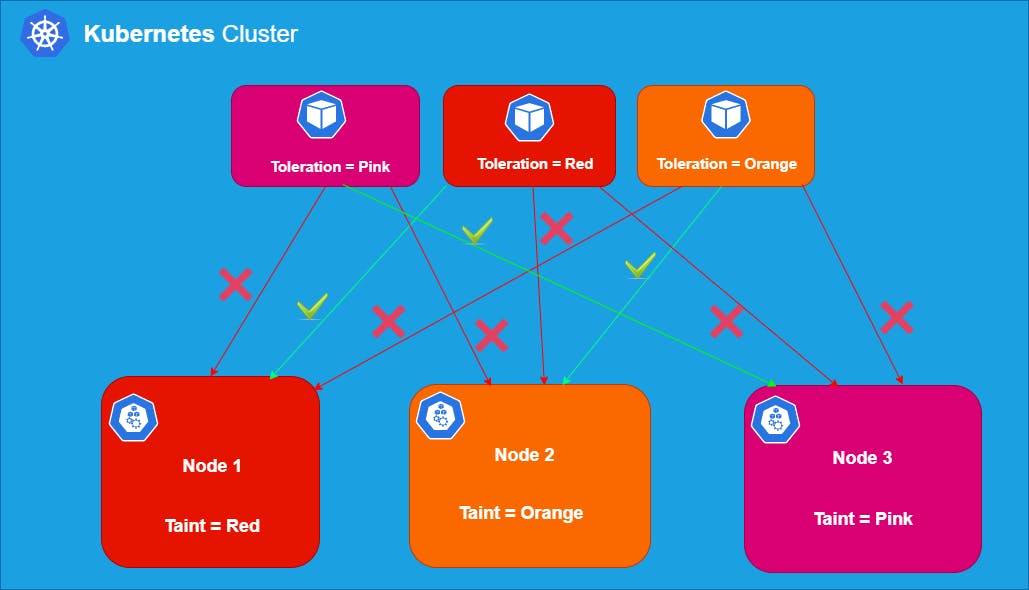
In the last article we have learnt about Node affinity. Taints and Toleration functions similarly but take an opposite approach.
When we use Node affinity (a property of Pods) it attracts them to a set of nodes (either as a preference or a hard requirement). Taints behaves exactly opposite, they allow a node to repel a set of pods.
In Kubernetes you can mark (taint) a node so that no pods can be scheduled on that node unless they have explicit tolerations applied. Tolerations are applied to pods, and allow (but do not require) the pods to schedule onto nodes with matching taints.
Taints and tolerations working together ensures that pods are not scheduled onto inappropriate nodes.
Taints Syntax
The common taints syntax is:
key=value:Effect
Three different values can be assigned to effect:
NoSchedule: if there is at least one un-ignored taint with effect NoSchedule then Kubernetes will not schedule the pod onto that node. Already existing Pods which doesn't tolerate this taint, will not be evicted or deleted from this node. But no more pods will be scheduled on this node unless have matching tolerations. It's a hard constraint.
PreferNoSchedule: Kubernetes will try not to schedule the Pod on the node if at least one un-tolerated taint has a PreferNoSchedule effect. But if there is a pod which tolerates one taint, it can be scheduled. It's a soft constraint.
NoExecute: If there is at least one un-ignored taint with effect NoExecute then the pod will be evicted from the node (if it is already running on the node), and will not be scheduled onto the node (if it is not yet running on the node). It's a strong constraint.
We can apply more than one taint to a single node and more than one toleration to a single Pod.
Adding Taints to Nodes
Syntax:
kubectl taint nodes <node_name> key=value:effect
- Let us first have a look at the already running pods on the different nodes
root@kube-master:~# kubectl get pods -o wide

- Now we will apply the taint on the node
kube-worker2
root@kube-master:~# kubectl describe nodes kube-worker2  | grep -i taint
Taints:             <none>

root@kube-master:~# kubectl taint nodes kube-worker2 new-taint=taint_demo:NoSchedule
node/kube-worker2 tainted

root@kube-master:~# kubectl describe nodes kube-worker2  | grep -i taint
Taints:             new-taint=taint_demo:NoSchedule
In the example above I've applied a taint new-taint=taint_demo:NoSchedule on the node kube-worker2.
Let us look at the running pods now:
root@kube-master:~# kubectl get pods -o wide

According to the NoSchedule effect, already running pods aren't affected.
- Now let’s taint the same node with the
NoExecuteeffect.
root@kube-master:~# kubectl taint nodes kube-worker2 new-taint=taint_demo:NoExecute
node/kube-worker2 tainted

root@kube-master:~# kubectl describe nodes kube-worker2  | grep -i taint
Taints:             new-taint=taint_demo:NoExecute
                    new-taint=taint_demo:NoSchedule
Let us look at the running pods now:
root@kube-master:~# kubectl get pods -o wide
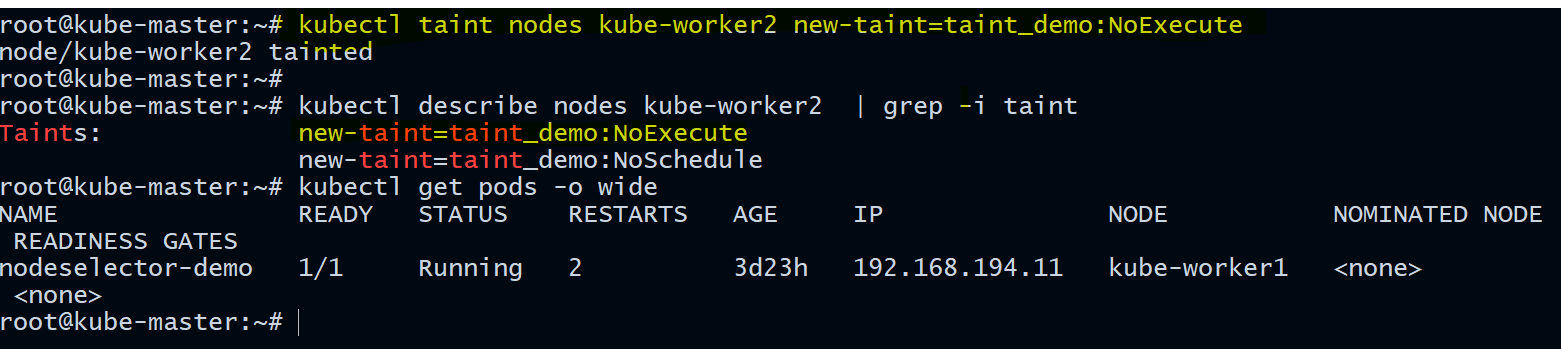
All the pods which doesn't tolerate the taint are now evicted.
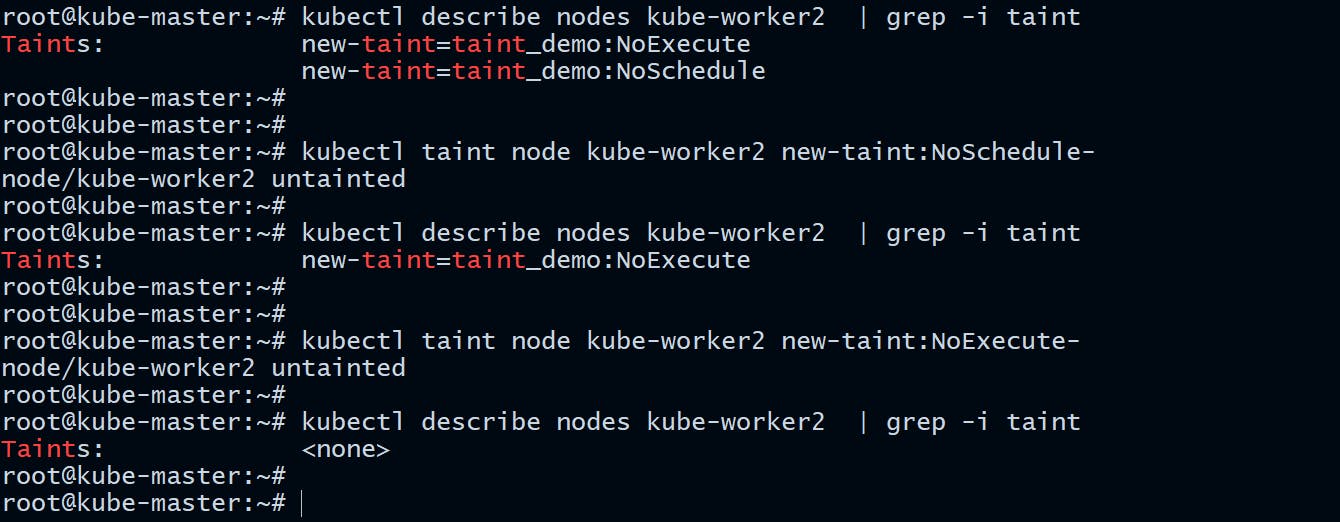
Removing Taints from a Node
If you no longer need a taint, run the following command to remove them:
root@kube-master:~# kubectl taint node kube-worker2 new-taint:NoSchedule-
node/kube-worker2 untainted

root@kube-master:~# kubectl taint node kube-worker2 new-taint:NoExecute-
node/kube-worker2 untainted
Adding Toleration to Pods
You can specify a toleration for a pod in the PodSpec.
- Let us taint our node again with
NoScheduleeffect.
root@kube-master:~# kubectl taint nodes kube-worker2 new-taint=taint_demo:NoSchedule
node/kube-worker2 tainted
- Let us deploy a pod with Taint toleration
Here is our manifest file:
root@kube-master:~/taint_tolerations# cat toleration.yaml
apiVersion: v1
kind: Pod
metadata:
  name: nginx-toleration-demo
  labels:
    env: staging
spec:
  containers:
  - name: nginx
    image: nginx
    imagePullPolicy: IfNotPresent
  tolerations:
  - key: "new-taint"
    operator: "Equal"
    value: "taint_demo"
    effect: "NoSchedule"
The Pod’s toleration has the key new-taint, the value true, and the effect NoSchedule, which matches to the taint we applied earlier on node kube-worker2.
That means this pod is now eligible to get scheduled onto the node kube-worker2. However, this doesn't guarantee the Pod's scheduling on kuber-worker2 as we din't specify any node affinity or nodeSelector.
The default value for
operatorisEqual.A toleration "matches" a taint if the keys are the same and the effects are the same, and:
the operator is
Exists(in which case no value should be specified), orthe operator is
Equaland the values are equal.
- Apply the Pod manifest file
root@kube-master:~/taint_tolerations# kubectl apply -f toleration.yaml
pod/nginx-toleration-demo created
- Verify on which Node the Pod is running
root@kube-master:~/taint_tolerations# kubectl get pods -o wide
NAME                    READY   STATUS    RESTARTS   AGE     IP                NODE           NOMINATED NODE   READINESS GATES
nginx-toleration-demo   1/1     Running   0          7s      192.168.161.196   kube-worker2   <none>           <none>
nodeselector-demo       1/1     Running   2          3d23h   192.168.194.11    kube-worker1   <none>           <none>
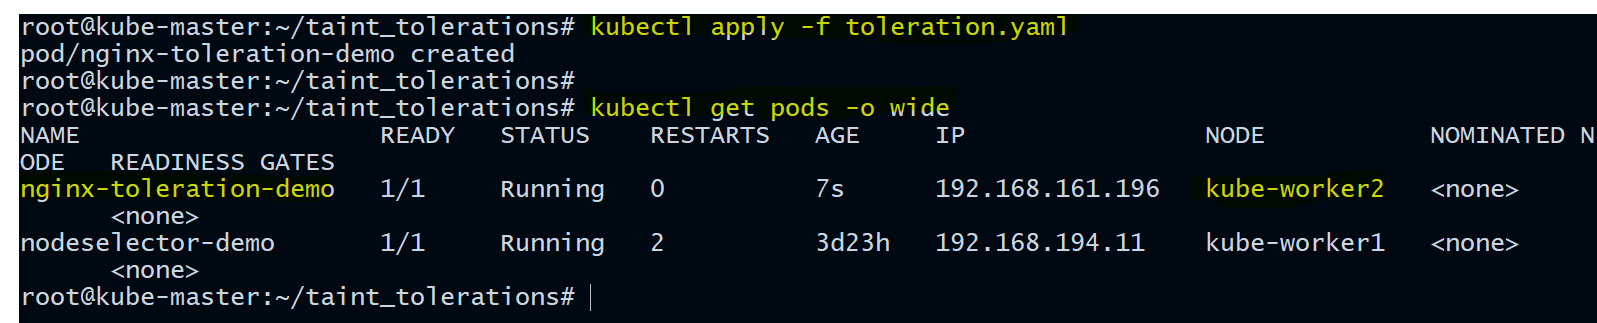
You can see above our nginx-toleration-demo got scheduled on node kube-worker2.
Note: There are two special cases:
An empty key with operator Exists matches all keys, values and effects which means this will tolerate everything.
An empty effect matches all effects with the specified key.
A node can have multiple taints and the pod can have multiple tolerations. The way Kubernetes processes multiple taints and tolerations is like a filter: start with all of a node's taints, then ignore the ones for which the pod has a matching toleration; the remaining un-ignored taints have the indicated effects on the pod.
Important Notes regarding Tolerations
If there is at least one un-ignored taint with effect
NoSchedulethen Kubernetes will not schedule the pod onto that node.If there is no un-ignored taint with effect
NoSchedulebut there is at least one un-ignored taint with effectPreferNoSchedulethen Kubernetes will try to not schedule the pod onto the node.If there is at least one un-ignored taint with effect
NoExecutethen the pod will be evicted from the node (if it is already running on the node), and will not be scheduled onto the node (if it is not yet running on the node).
Let us take an example:
- I have tainted our
kuber-worker2node like this
root@kube-master:~# kubectl taint nodes kube-worker2 new-taint=taint_demo:NoExecute

root@kube-master:~# kubectl taint nodes kube-worker2 new-taint=taint_demo:NoSchedule

root@kube-master:~# kubectl taint nodes kube-worker2 new-taint2=taint_demo2:NoSchedule
- Verify the taints applied
root@kube-master:~# kubectl describe nodes kube-worker2  | grep -i taint
Taints:             new-taint=taint_demo:NoExecute
                    new-taint=taint_demo:NoSchedule
                    new-taint2=taint_demo2:NoSchedule
- Our Pod manifest file
Here is our Pod Manifest file:
root@kube-master:~/taint_tolerations# cat toleration-2.yaml
apiVersion: v1
kind: Pod
metadata:
  name: nginx-toleration-demo
  labels:
    env: staging
spec:
  containers:
  - name: nginx
    image: nginx
    imagePullPolicy: IfNotPresent
  tolerations:
  - key: "new-taint"
    operator: "Equal"
    value: "taint_demo"
    effect: "NoSchedule"
  - key: "new-taint"
    operator: "Equal"
    value: "taint_demo"
    effect: "NoExecute"
In this case, the pod will not be able to schedule onto the node, because there is no toleration matching the third taint. But it will be able to continue running if it is already running on the node when the taint is added, because the third taint is the only one of the three that is not tolerated by the pod.
With effect NoExecute any pods that do not tolerate the taint will be evicted immediately, and pods that do tolerate the taint will never be evicted. However, a toleration with NoExecute effect can specify an optional tolerationSeconds field that dictates how long the pod will stay bound to the node after the taint is added.
For example:
tolerations:
- key: "new-taint"
  operator: "Equal"
  value: "taint_demo"
  effect: "NoExecute"
  tolerationSeconds: 3600
This means that if this pod is running and a matching taint is added to the node, then the pod will stay bound to the node for 3600 seconds, and then be evicted. If the taint is removed before that time, the pod will not be evicted.
Taints and Tolerations use cases
Dedicated Nodes
When you want to dedicate a set of nodes for exclusive workloads or for particular users, you can add a taint to those nodes (say, kubectl taint nodes nodename dedicated=groupName:NoSchedule) and then add a corresponding toleration to their pods.
Nodes with Special Hardware
In case of nodes with specialized hardware (for example GPUs), we would want only pods with those kind of requirements to run on those nodes. Tainting will help us there (for e.g. kubectl taint nodes nodename special=true:NoSchedule or kubectl taint nodes nodename special=true:PreferNoSchedule) and adding a corresponding toleration to pods that use the special hardware.
Taint based Evictions
A per-pod-configurable eviction behavior when there are node problems. The node controller automatically taints a Node when certain conditions are true.
The built in taints:
- node.kubernetes.io/not-ready: Node is not ready.
- node.kubernetes.io/unreachable: Node is unreachable from the node controller. When
NodeConditionReady being "Unknown". - node.kubernetes.io/memory-pressure: Node has memory pressure.
- node.kubernetes.io/disk-pressure: Node has disk pressure.
- node.kubernetes.io/pid-pressure: Node has PID pressure.
- node.kubernetes.io/network-unavailable: Node's network is unavailable.
- node.kubernetes.io/unschedulable: Node is unschedulable.
This is all about Kubernetes Taints and Tolerations.
Hope you like the tutorial. Stay tuned and don't forget to provide your feedback in the response section.
Happy Learning!