

Linux Access Management: Beginner to Advanced
Managing File and Directory Permissions: chmod, suid, sgid, stickybit


In this article we will learn about how Access Management works on Linux operating system.
Manage File and Directory Permissions
Managing file permissions is sometimes confusing and can be challenging for someone who is new to Linux/Unix operating systems.
Being a multi-user operating system having adequate file permissions in place becomes more crucial on Linux.
How to view the file and directory permissions?
By using ls command with option -l we can view the permissions which are set for the contents aka files of a directory.
For example:
root@lco-linux-master:~/file_perms_demo# ls -l
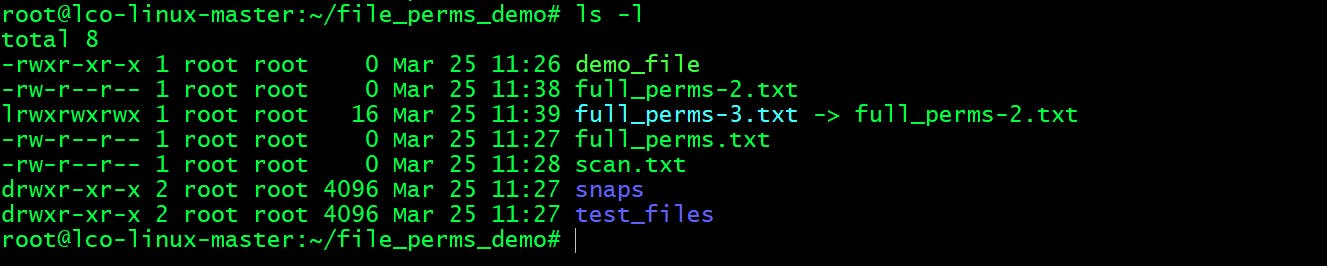
We will breakdown this output in 7 columns.
As part of this article we will understand the first two columns in detail.
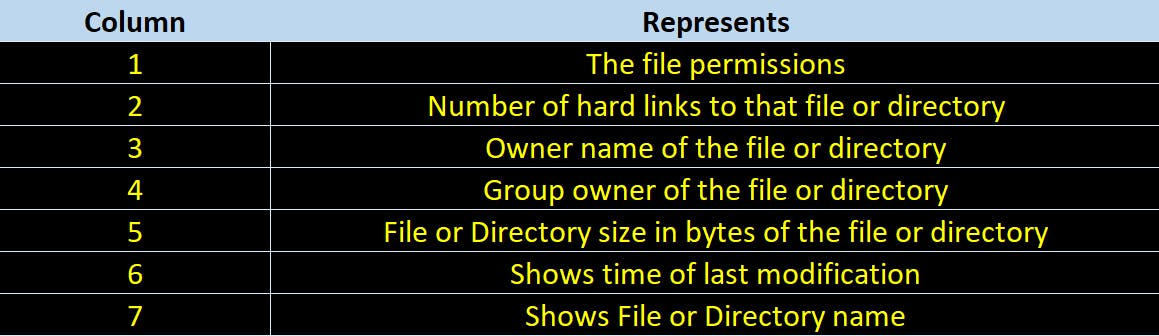
- First column is about the file permissions.
Let's understand by the taking one value from top -rwx-rw-rw- and another from down drwxr-xr-x.
The very first character denotes the type of file.

In the same column starting from second character the three sets of characters, three times, indicating permissions for owner, group and others.

this may be followed by some other character which denotes extended or alternate permissions, for e.g. Linux ACL's that are marked with a
+. We will take a look at that later.
Following characters can be part of each of the three permission triads (rwx). The following table will make you understand what each of these character values means when set to a file or directory.

Along with
xthere are 3 more bits which can be set to a filesetuid(will be part of user/owner triad),setgid(will be part of group triad) andsticky bit(will be part of others triad). We will learn about that later. Setting any of them automatically implies thatxis set.
Now let us understand the three triads by taking example of our first file's permissions which is demo_file.
root@lco-linux-master:~/file_perms_demo# ls -l demo_file
-rwxr-xr-x 1 root root 0 Mar 25 11:26 demo_file
user: First three characters after the first one which denotes the type of file belongs toownertriad. In our case they are set torwxthat means the owner of that file has full permissions assigned (Read, Write and Execute).group: The next three characters after theownertriad belongs togrouptriad. In our case they are set torwthat means all users belonging to that group will have the read and write permissions assigned to that file.others: The final three characters after thegroup ownertriad belongs tootherstriad. In our case they are set torwthat means all other users has read and write permissions assigned to that file.
- Second column belongs to the number of hard links to that file or directory.
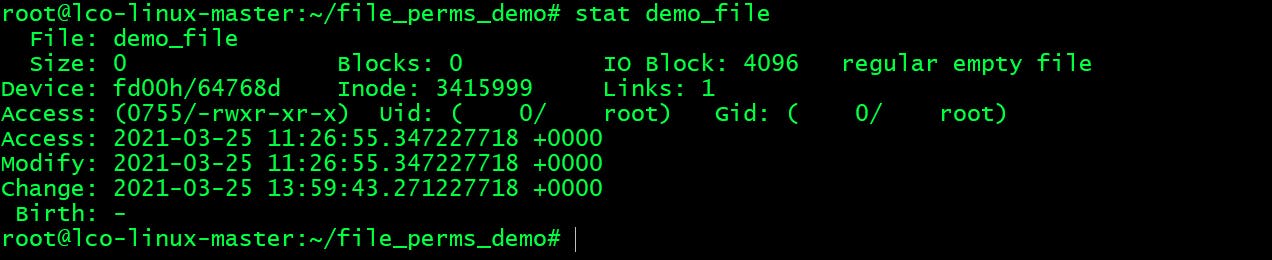
For e.g. let's find out link information for
demo_fileaslsoutput shows it as 1.
root@lco-linux-master:~/file_perms_demo# stat demo_file
Similarly find link information about a directory.
root@lco-linux-master:~/file_perms_demo# stat snaps/
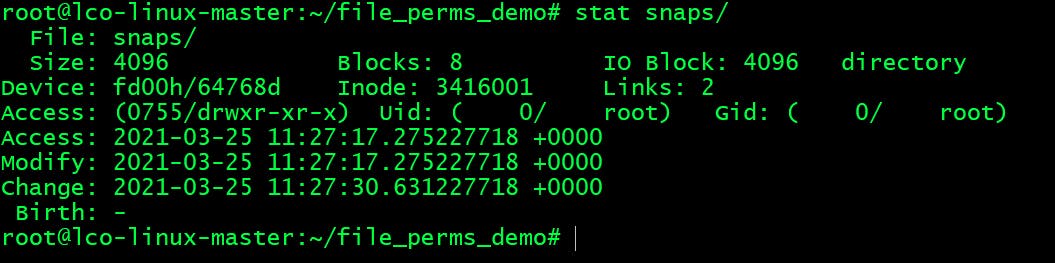
Every directory has two links when created as historically the first Unix filesystem created two entries in every directory:
.pointing to the directory itself, and..pointing to its parent. Thus the link count of a directory is 2 + the number of directories immediately contained by it.
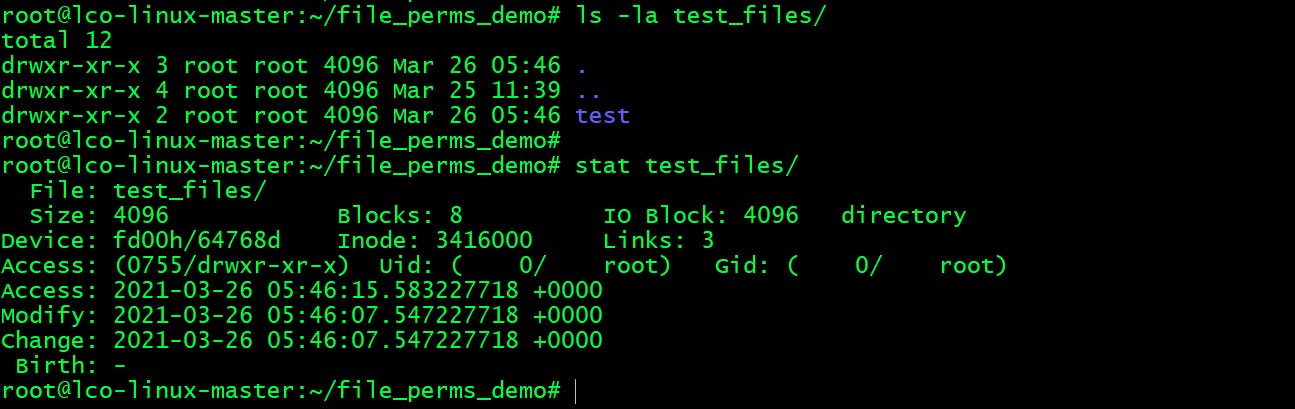
The directory below here test_files has three links as it has one subdirectory test as well created along with . and ...
root@lco-linux-master:~/file_perms_demo# stat test_files/
How do I Change Permissions ?
There is a command named chmod in Linux which is used to change the file or directory permissions.
There are three methods of changing file permissions using chmod.
Method 1: Text Method =>
Syntax of changing file/dir permissions using text method -
chmod [OPTIONS] [ugoa…][-+=]perms…[,…] FILE/DIR...
Let us understand it one by one.
chmodcommand has many options. Commonly used one is as follows:
-R, --recursive -> change files and directories recursively
- The second set is
user denotation flags([ugoa…]) which defines users class to which the file permissions will be affecting to.

- The third set is
operation denotation.

Examples ->
- Give the
ownerof thedemo_filefull permissions (read, write and execute)root@lco-linux-master:~/file_perms_demo# chmod u=rwx demo_file

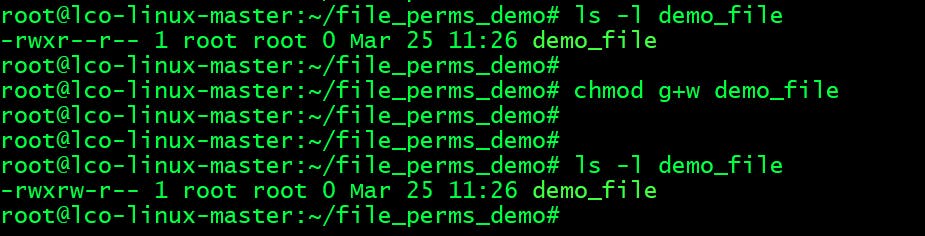
- Give the
writepermission forgroupmembers:root@lco-linux-master:~/file_perms_demo# chmod g+w demo_file
- Recursively remove the
writepermission for group users:root@lco-linux-master:~/file_perms_demo# chmod -R g-w demo_file

- Give
executepermission to all:root@lco-linux-master:~/file_perms_demo# chmod a+x demo_file

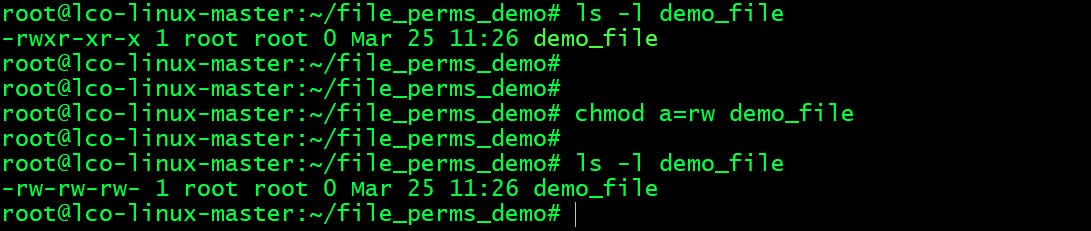
- Give
read/writepermissions to all:root@lco-linux-master:~/file_perms_demo# chmod a=rw demo_file
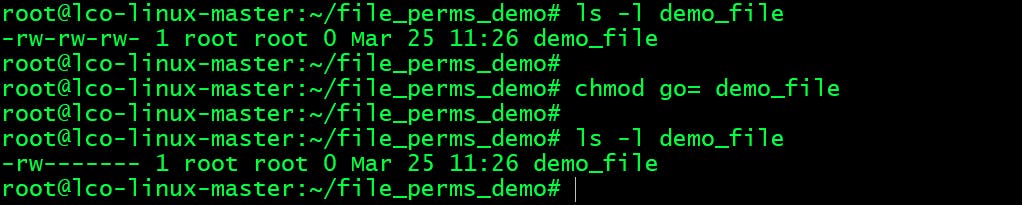
- Remove all permissions from group and others:
root@lco-linux-master:~/file_perms_demo# chmod go= demo_file
- Give read/write to owner, read/execute to group and read permissions to others:
root@lco-linux-master:~/file_perms_demo# chmod u=rw,g=rx,o=r demo_file

Method 2: Numeric Method =>
The syntax of assigning permissions through numeric method is:
chmod [OPTIONS] NUMBER FILE/DIR...
When we use numeric method we can set permissions for all classes of users owner/group/others together.
Number values for read, write and execute permissions are as follows:
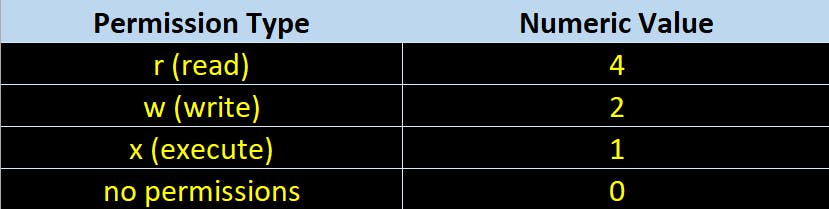
By doing sum of above values we can assign the permissions to all user classes. Let us understand it by few examples.
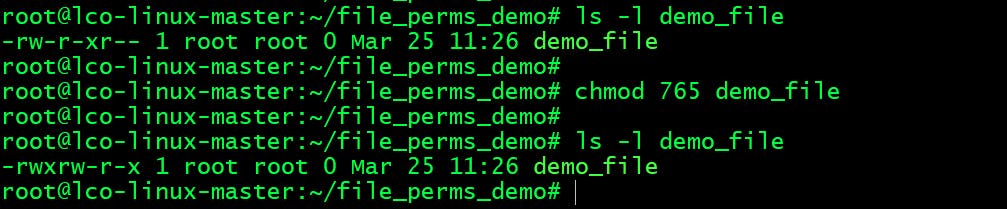
- Assign
read/write/executepermissions toowner,read/writepermissions togroupandread/executepermissions toothersondemo_file.
rwx will be 4+2+1 which is 7.
rw will be 4+2 which is 6.
rx will be 4+1 which is 5.
root@lco-linux-master:~/file_perms_demo# chmod 765 demo_file
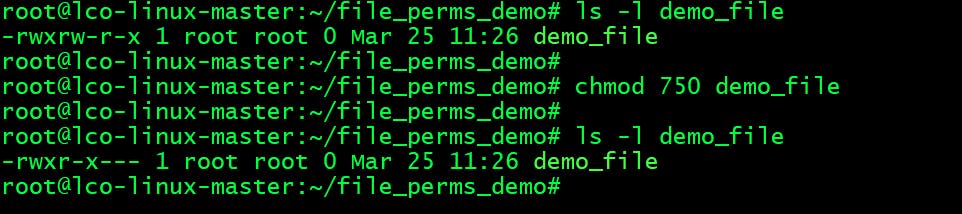
- Assign read/write/execute to owner, assign read/execute to group and remove all permissions from others:
root@lco-linux-master:~/file_perms_demo# chmod 750 demo_file
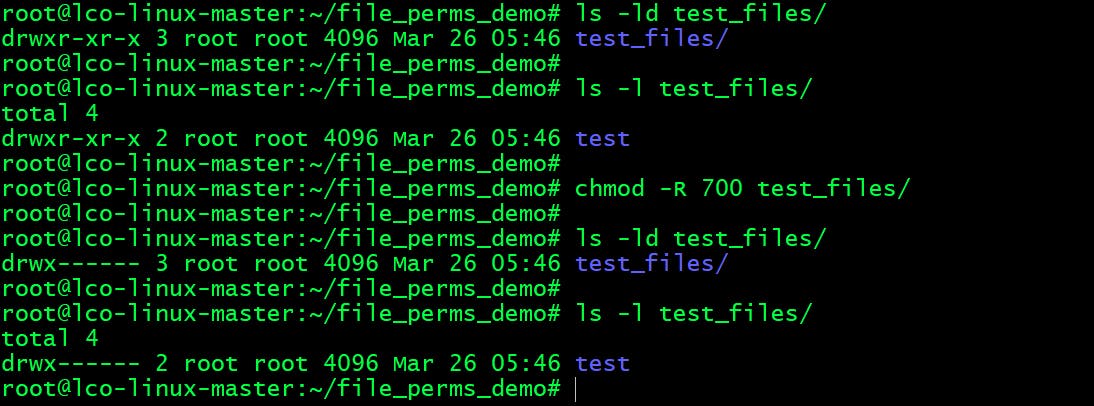
- Recursively set read, write, and execute permissions to the file owner and no permissions for all other users on a directory:
This will change permissions of all the subdirectories as well with the parent directory.
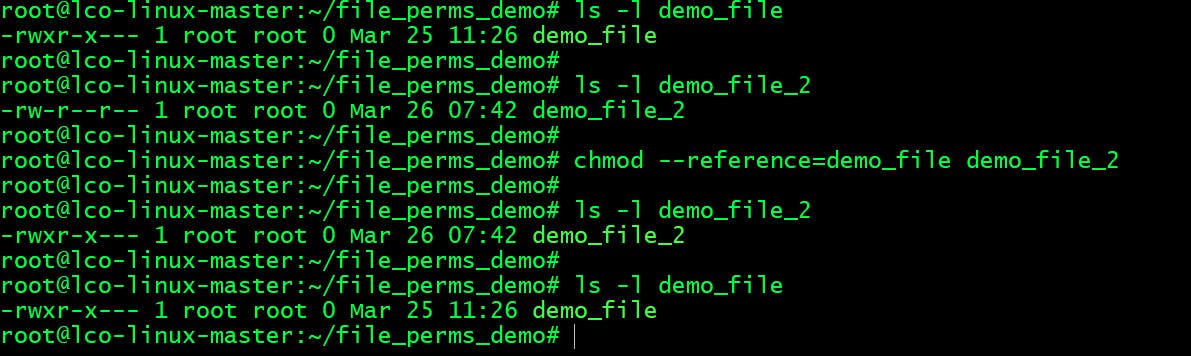
Method 3: Reference file Method =>
We can use the --reference=ref_file option to set the file’s permissions to be same as the specified reference file (ref_file).
chmod --reference=REF_FILE FILE
For example, the following command will assign the permissions of the file1 to file2
root@lco-linux-master:~/file_perms_demo# chmod --reference=demo_file demo_file_2
Use
statcommand to view the existing permissions of a file or directory in numeric form:root@lco-linux-master:~/file_perms_demo# stat -c %a demo_file 750 root@lco-linux-master:~/file_perms_demo# stat -c %a test_files/ 700
Special Permissions sets
There are three special type of permission sets in Linux operating system
- setuid
- setgid
- sticky bit
What is Setuid?
Setuid permission set allows a user to execute that file or program with the permission of the owner of that file. This setting elevates the privileges of the current user.
If a file has “setuid” bit set (denoted by small case s) and is owned by the user “root” then a user that has the ability to execute that program will do so as the user root instead of themselves.
For e.g. ‘sudo’ command.
root@lco-linux-master:~# ls -l /usr/bin/sudo
-rwsr-xr-x 1 root root 149080 Jan 31  2020 /usr/bin/sudo
You can see in the user triad there is a small case s in place of x which denotes setuid bit set. This file is set to world executable.
Now all the users who has permission to run sudo command will run with the power of its owner which is root.
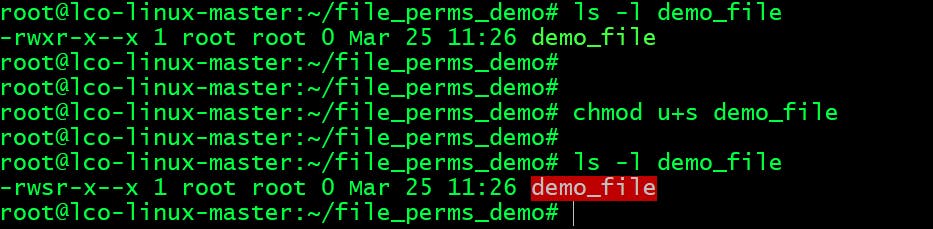
How to setup setuid =>
Run following command to set setuid or suid bit on a file:
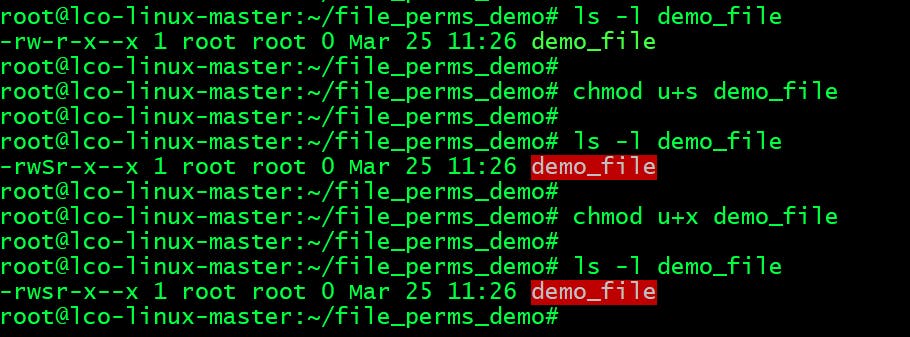
root@lco-linux-master:~/file_perms_demo# chmod u+s demo_file
If the user who owns the file himself doesn't have execute permissions you will see a capital
Sinstead ofs. To change that you need to later assign execute permissions to owner.
What is Setgid?
Setgid when set allows a process, when executed, to run as the group that owns the file.
Example is ‘crontab’ command.
root@lco-linux-master:~# which crontab
/usr/bin/crontab

root@lco-linux-master:~# ls -l /usr/bin/crontab
-rwxr-sr-x 1 root crontab 39352 Nov 16  2017 /usr/bin/crontab
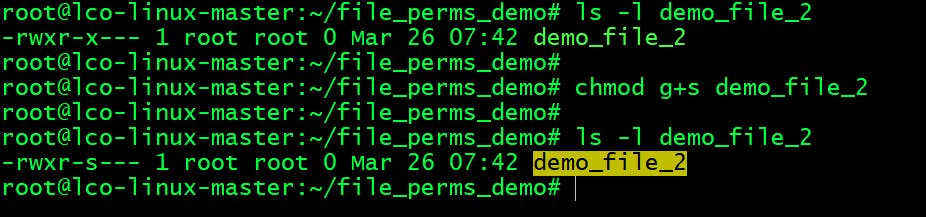
How to setup setgid =>
Run the following command to set sgid bit.
root@lco-linux-master:~/file_perms_demo# chmod g+s demo_file_2
When we set Setgid on a directory it has a different effect. A directory that has ‘setgid’ on it will cause all files that are created in that directory to be owned by the group of the directory as opposed to the group of the owner.
For example: Create a directory ->
root@lco-linux-master:~/file_perms_demo# mkdir sgid_test
root@lco-linux-master:~/file_perms_demo# ls -ld sgid_test/
drwxr-xr-x 2 root root 4096 Mar 26 08:33 sgid_test/
Create a test group:
root@lco-linux-master:~/file_perms_demo# groupadd test_grp
Change group of the directory we created:
root@lco-linux-master:~/file_perms_demo# chgrp test_grp sgid_test
root@lco-linux-master:~/file_perms_demo#
root@lco-linux-master:~/file_perms_demo# ls -ld sgid_test/
drwxr-xr-x 2 root test_grp 4096 Mar 26 08:33 sgid_test/
Assign the sgid bit on directory:
root@lco-linux-master:~/file_perms_demo# chmod g+s sgid_test/
root@lco-linux-master:~/file_perms_demo#
root@lco-linux-master:~/file_perms_demo# ls -ld sgid_test/
drwxr-sr-x 2 root test_grp 4096 Mar 26 08:33 sgid_test/
Create few files under that directory and check their group memberships:
root@lco-linux-master:~/file_perms_demo# touch sgid_test/test_file-1
root@lco-linux-master:~/file_perms_demo# touch sgid_test/test_file-2
root@lco-linux-master:~/file_perms_demo#
root@lco-linux-master:~/file_perms_demo# ls -l sgid_test/
total 0
-rw-r--r-- 1 root test_grp 0 Mar 26 08:35 test_file-1
-rw-r--r-- 1 root test_grp 0 Mar 26 08:35 test_file-2
You can see all the new files are taking group membership from the group owner of that directory instead of the owner which is root user.
What is Sticky Bit?
This is one of the most important file permission type. When this is set on a directory, the files in that directory can only be removed by the owner.
The best example of this is the /tmp directory. Any user can write to that but users cannot delete the files of other users.
"When more than one user works on a project directory that time it becomes critical. To stop accidental deletions we apply sticky bit on the directories."
How to setup sticky bit =>
Run the following set of command to apply sticky bit.
Create a directory:
root@lco-linux-master:/srv# mkdir sticky_bit_test
root@lco-linux-master:/srv# ls -ld sticky_bit_test/
drwxr-xr-x 2 root root 4096 Mar 26 08:48 sticky_bit_test/
Apply sticky bit on that directory:
root@lco-linux-master:/srv# chmod o+t sticky_bit_test/
root@lco-linux-master:/srv#
root@lco-linux-master:/srv# ls -ld sticky_bit_test/
drwxr-xr-t 2 root root 4096 Mar 26 08:48 sticky_bit_test/
Now give full permissions to the directory:
root@lco-linux-master:/srv# chmod 777 sticky_bit_test/
root@lco-linux-master:/srv# ls -ld sticky_bit_test/
drwxrwxrwx 2 root root 4096 Mar 26 08:48 sticky_bit_test/
Create some test files:
root@lco-linux-master:/srv# touch sticky_bit_test/test_file_1
root@lco-linux-master:/srv# ls -l sticky_bit_test/
total 0
-rw-r--r-- 1 root root 0 Mar 26 08:51 test_file_1
Login with a different user and try to delete other user's file:
root@lco-linux-master:/srv# su - linux_master
linux_master@lco-linux-master:~$

linux_master@lco-linux-master:/srv/sticky_bit_test$ rm -rf test_file_1
rm: cannot remove 'test_file_1': Operation not permitted

linux_master@lco-linux-master:/srv/sticky_bit_test$ rm -rf test_file_2
rm: cannot remove 'test_file_2': Operation not permitted
If you remove the sticky bit from the directory than anyone can delete the files from there:
root@lco-linux-master:/srv# chmod o-t sticky_bit_test/

root@lco-linux-master:/srv# su - linux_master

linux_master@lco-linux-master:~$ cd /srv/sticky_bit_test/

linux_master@lco-linux-master:/srv/sticky_bit_test$ rm -rf test_file_1
linux_master@lco-linux-master:/srv/sticky_bit_test$ rm -rf test_file_2

linux_master@lco-linux-master:/srv/sticky_bit_test$ ls -l
total 0
For the special permissions, one can prepend these numbers with another number where 4 is setuid, 2 is setgid, and 1 represents the sticky bit.
root@lco-linux-master:~/file_perms_demo# chmod 4755 testfile.txt
root@lco-linux-master:~/file_perms_demo# ls -l testfile.txt
-rwsr-xr-x 1 root root 0 Mar 27 04:03 test.txt

root@lco-linux-master:~/file_perms_demo# chmod 2755 testfile.txt
root@lco-linux-master:~/file_perms_demo# ls -l testfile.txt
-rwxr-sr-x 1 root root 0 Mar 27 04:03 testfile.txt

root@lco-linux-master:~/file_perms_demo# chmod 1755 testdir
root@lco-linux-master:~/file_perms_demo# ls -ld testdir/
drwxr-xr-t 2 root root 4096 Mar 27 04:03 testdir/
That's all for this comprehensive tutorial about Linux File permissions.
Hope you like the article. Stay Tuned for more.
Thank you. Happy learning!