


In this article, we're going to create simple Todo REST APIs with complete CRUD functionality using Node.js, Express, and MongoDB.
 Prerequisites:
You have to have Node installed on your computer. (Download Node)
You have to have MongoDB installed on your computer. (Download MongoDB)
VS Code, to run our code. (Download VS Code)
Postman, to test our APIs. (Download Postman)
CREATE A PROJECT:
Create a folder on your Desktop and call it as todo_restapi. Now, go ahead and open that folder in VS Code.
Fire up your terminal in VS Code by clicking Ctrl + ~ and run the following command to initialize a project:
npm init
After hitting enter, it will ask you to add some info about the project as follows:
package name: (todo_restapi) #add name of your project if your are okay with the default one, simply hit enter
version: (1.0.0)
description: todo rest apis
entry point: (index.js)
test command: #just click enter without entering any command
git repository: #just click enter without entering repo url
keywords: #just click enter without entering any keywords
author: shubham waje
license: (ISC)
About to write to C:\Users\shubham\Desktop\todo_restapi\package.json:

{
  "name": "todo_restapi",
  "version": "1.0.0",
  "description": "todo rest apis",
  "main": "index.js",
  "scripts": {
    "test": "echo \"Error: no test specified\" && exit 1"
  },
  "author": "shubham waje",
  "license": "ISC"
}


Is this OK? (yes) yes #type 'yes' and hit enter
This will generate a package.json file in your project directory which is a blueprint of your project. It consists of all the necessary data about your application like name, version number, dependencies, necessary commands, devDependencies etc.
INSTALL ALL THE NECESSARY PACKAGES:
Run the following commands to install all the necessary packages:
npm install express body-parser cors mongoose nodemon uuid
ADD THE START SCRIPT IN package.json:
Remove "test": "echo \"Error: no test specified\" && exit 1" from the scripts and add "start": "nodemon index.js" as follows:
{
  "name": "todo_restapi",
  "version": "1.0.0",
  "description": "todo rest apis",
  "main": "index.js",
  "scripts": {
    "start": "nodemon index.js" // nodemon will refresh the server on every save
  },
  "author": "shubham waje",
  "license": "ISC",
  "dependencies": {
    "body-parser": "^1.19.0",
    "cors": "^2.8.5",
    "express": "^4.17.1",
    "mongoose": "^5.9.25",
    "nodemon": "^2.0.4",
    "uuid": "^8.3.0"
  }
}
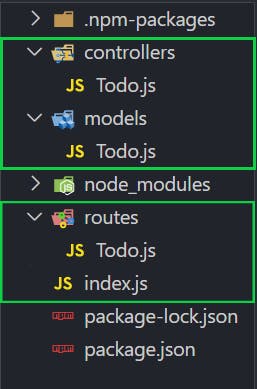
FOLDER STRUCTURE:
Create models/Todo.js, controllers/Todo.js, routes/Todo.js and index.js in your project directory as shown below:
DATABASE CONNECTION AND ROUTES:
In our index.js, we have to connect our database, add the necessary middlewares, and include our TodoRoutes.
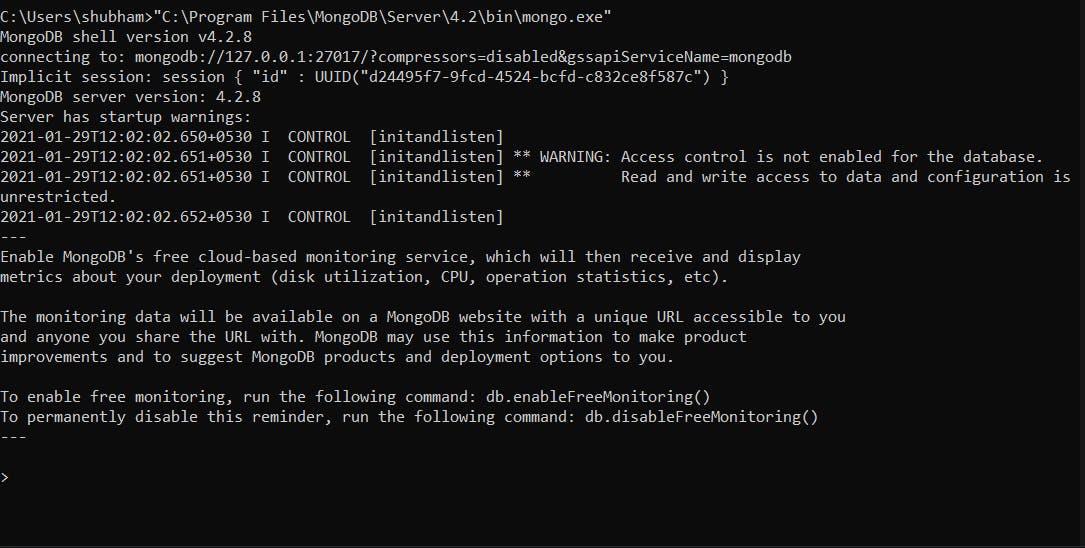
Before connecting our database we have to start our MongoDB server. So, go ahead and run the following command in your cmd/git bash:
"C:\Program Files\MongoDB\Server\<mongo_db_version_number>\bin\mongo.exe"
You should see the following output as soon as you run the above command (keep it running in the background):
Add following code in index.js:
// import all the necessary packages
const express = require("express");
const cors = require("cors");
const bodyParser = require("body-parser");
const mongoose = require("mongoose");
// we are using port 8000
const port = 8000;

// we will create these todoRoutes in the future
const todoRoutes = require("./routes/Todo");

const app = express();

// DB connection
mongoose
  .connect("mongodb://127.0.0.1:27017/todoapp", {
    useNewUrlParser: true,
    useUnifiedTopology: true,
    useCreateIndex: true,
  })
  .then(() => {
    console.log("CONNECTED TO DATABASE");
  });

// middleware for cors to allow cross origin resource sharing
app.use(cors());
// middleware to convert our request data into JSON format
app.use(bodyParser.json());

// include the todoRoutes
app.use("/api", todoRoutes);

// start the server in the port 8000
app.listen(port, () => {
  console.log(`Listening to http://localhost:${port}`);
});
TODO ROUTES:
Open routes/Todo.js and add endpoints for our todo application.
const express = require("express");
const router = express.Router();

// these are the controllers
// we will create all of them in the future
const {
  createTodo,
  getTodoById,
  getTodo,
  deleteTodo,
  getAllTodos,
  updateTodo,
} = require("../controllers/Todo");

//params
// it will fetch the value from the url
router.param("todoId", getTodoById);

// to get all the todos
router.get("/todos/", getAllTodos);

// to get a single todo
router.get("/todo/:todoId/", getTodo);

// to create a todo
router.post("/todo/create/", createTodo);

// to update the todo
router.put("/todo/:todoId/update", updateTodo);

// to delete the todo
router.delete("/todo/:todoId/delete", deleteTodo);

// we will export the router to import it in the index.js
module.exports = router;
TODO MODEL:
The model is a Javascript module that connects to the database and exports some functions that let us operate on the data.
We will be using mongoose which is an Object Data Modeling (ODM) library for MongoDB and Node.
const mongoose = require("mongoose");


const Todo = new mongoose.Schema(
  {
    task: {
      type: String,
      required: true,
      trim: true,
      maxlength: 30,
    },
  },
  { timestamps: true }
);

module.exports = mongoose.model("Todo", Todo);
TODO CONTROLLERS:
When the user hits a particular URL, the function associated with that URL gets executed.
First let's create a middleware in controllers/Todo.js:
const Todo = require("../models/Todo");

exports.getTodoById = (req, res, next, todoId) => {
  // todoId is coming from the router.param
  // .findById() method will find the todo which has id==todoId
  Todo.findById(todoId).exec((err, todo) => {
    if (err || !todo) {
      return res.status(400).json({
        error: "404 todo not found",
      });
    }
    // store that todo in req.todo so that other functions can use it
    req.todo = todo;
    // Because this is a middleware we have to call the next()
   // which will pass the control to the next function in the middleware stack
    next();
  });
};
Function to get all the todos:
exports.getAllTodos = (req, res) => {
  // simply use .find() method and it will return all the todos
  Todo.find()
    .sort("-createdAt")
    .exec((err, todos) => {
      // error checking
      if (err || !todos) {
        return res.status(400).json({
          error: "Something went wrong in finding all todos",
        });
      }
      // return all the todos in json format
      res.json(todos);
    });
};
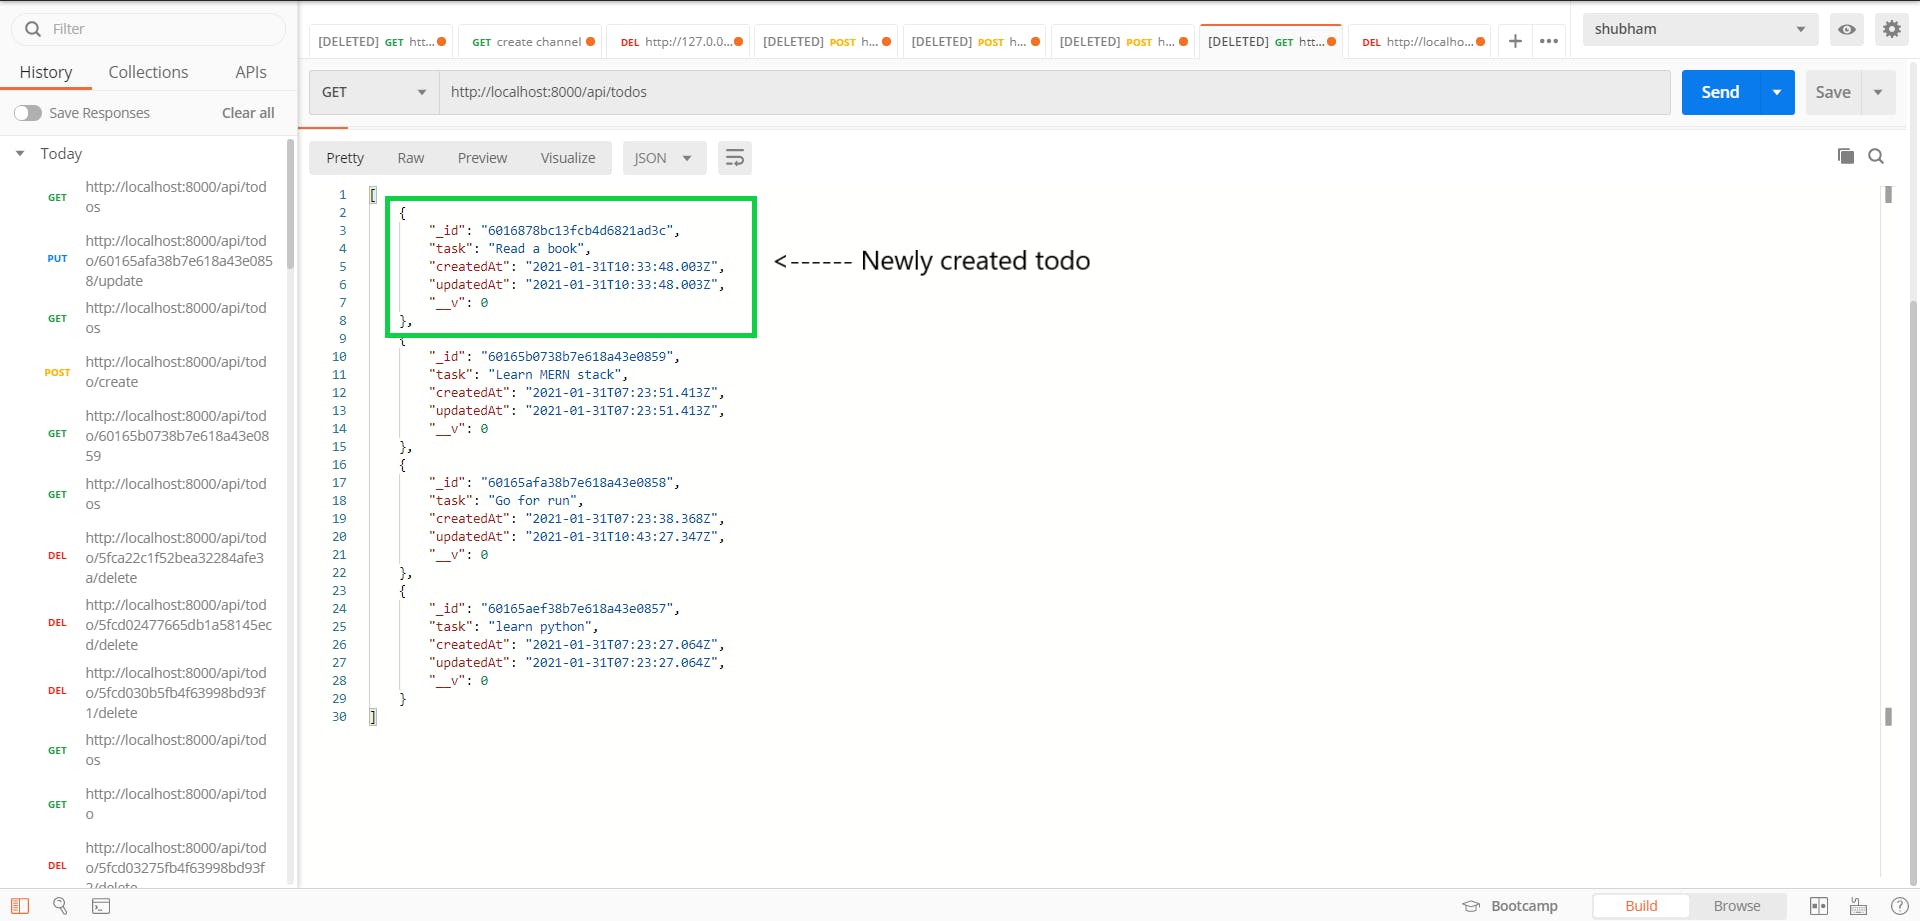
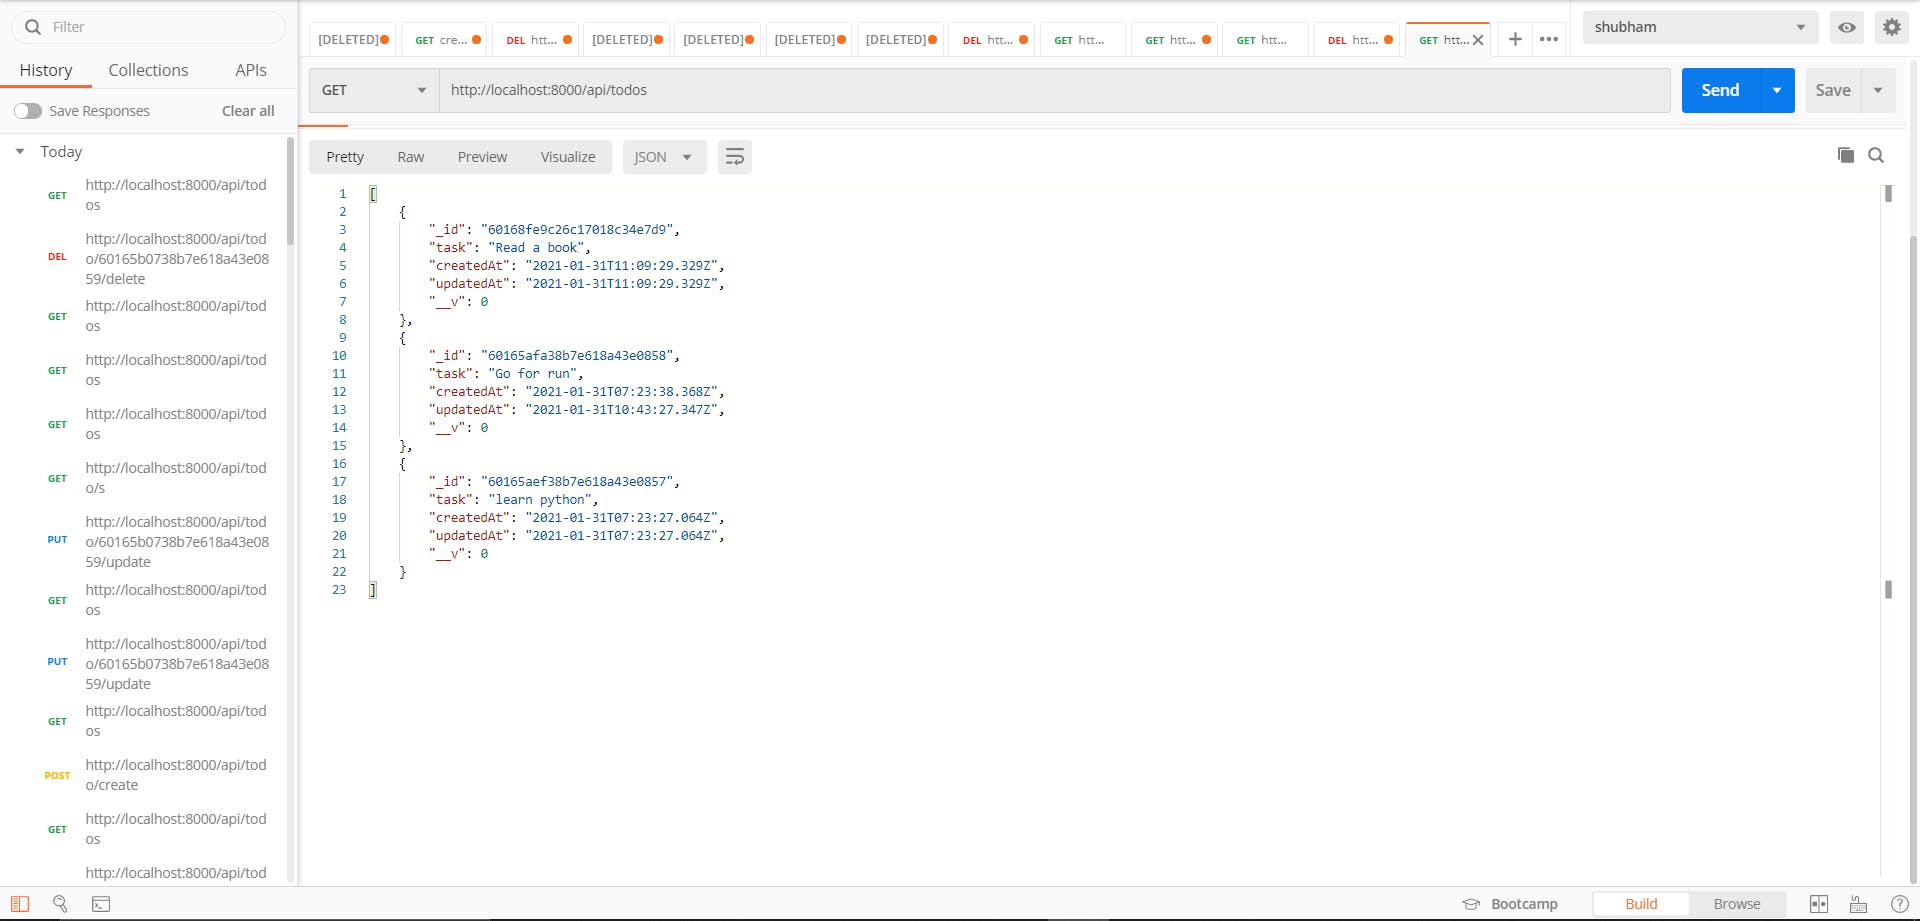
Let's hit http://localhost:8000/api/todos with the GET request and see if we get all the todos:
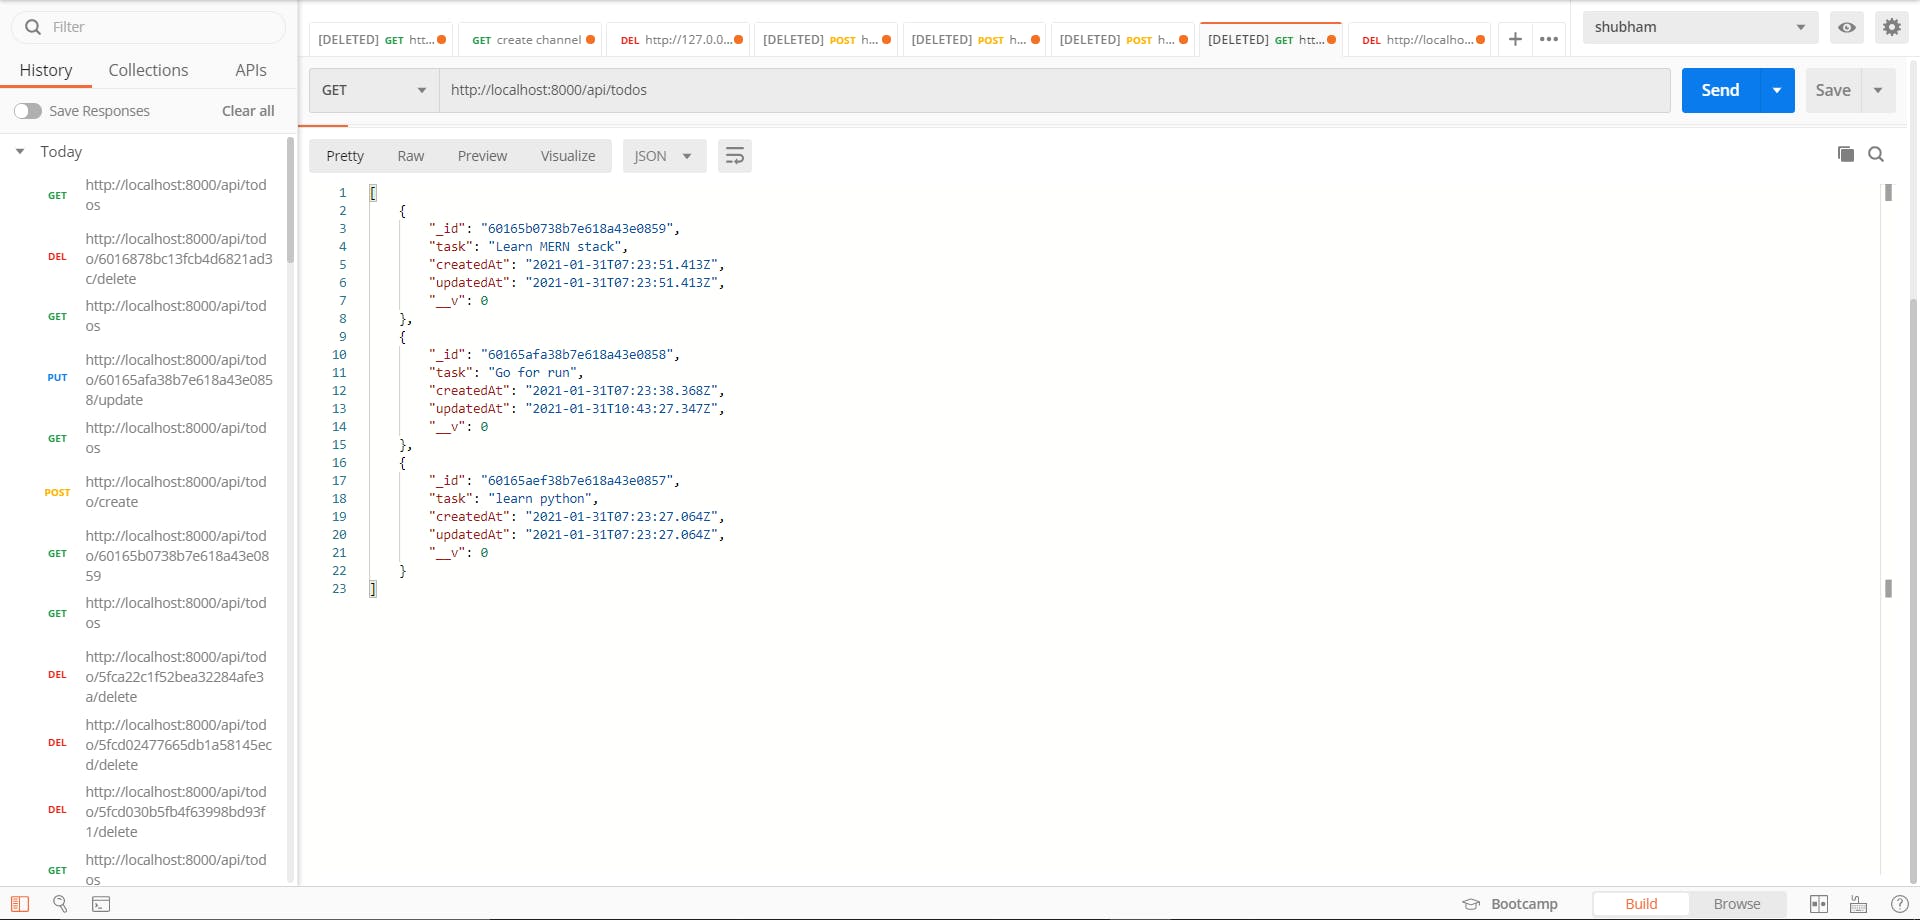 We got all the Todos that are already saved in our database.
Function to get an individual todo:
exports.getTodo = (req, res) => {
  // this is pretty simple because we've already defined a middleware
  // to get a todo from the URL id
  // this req.todo is coming from that middleware
  return res.json(req.todo);
};
Let's hit http://localhost:8000/api/todo/:todoId with the GET request and see if we get the particular todo:
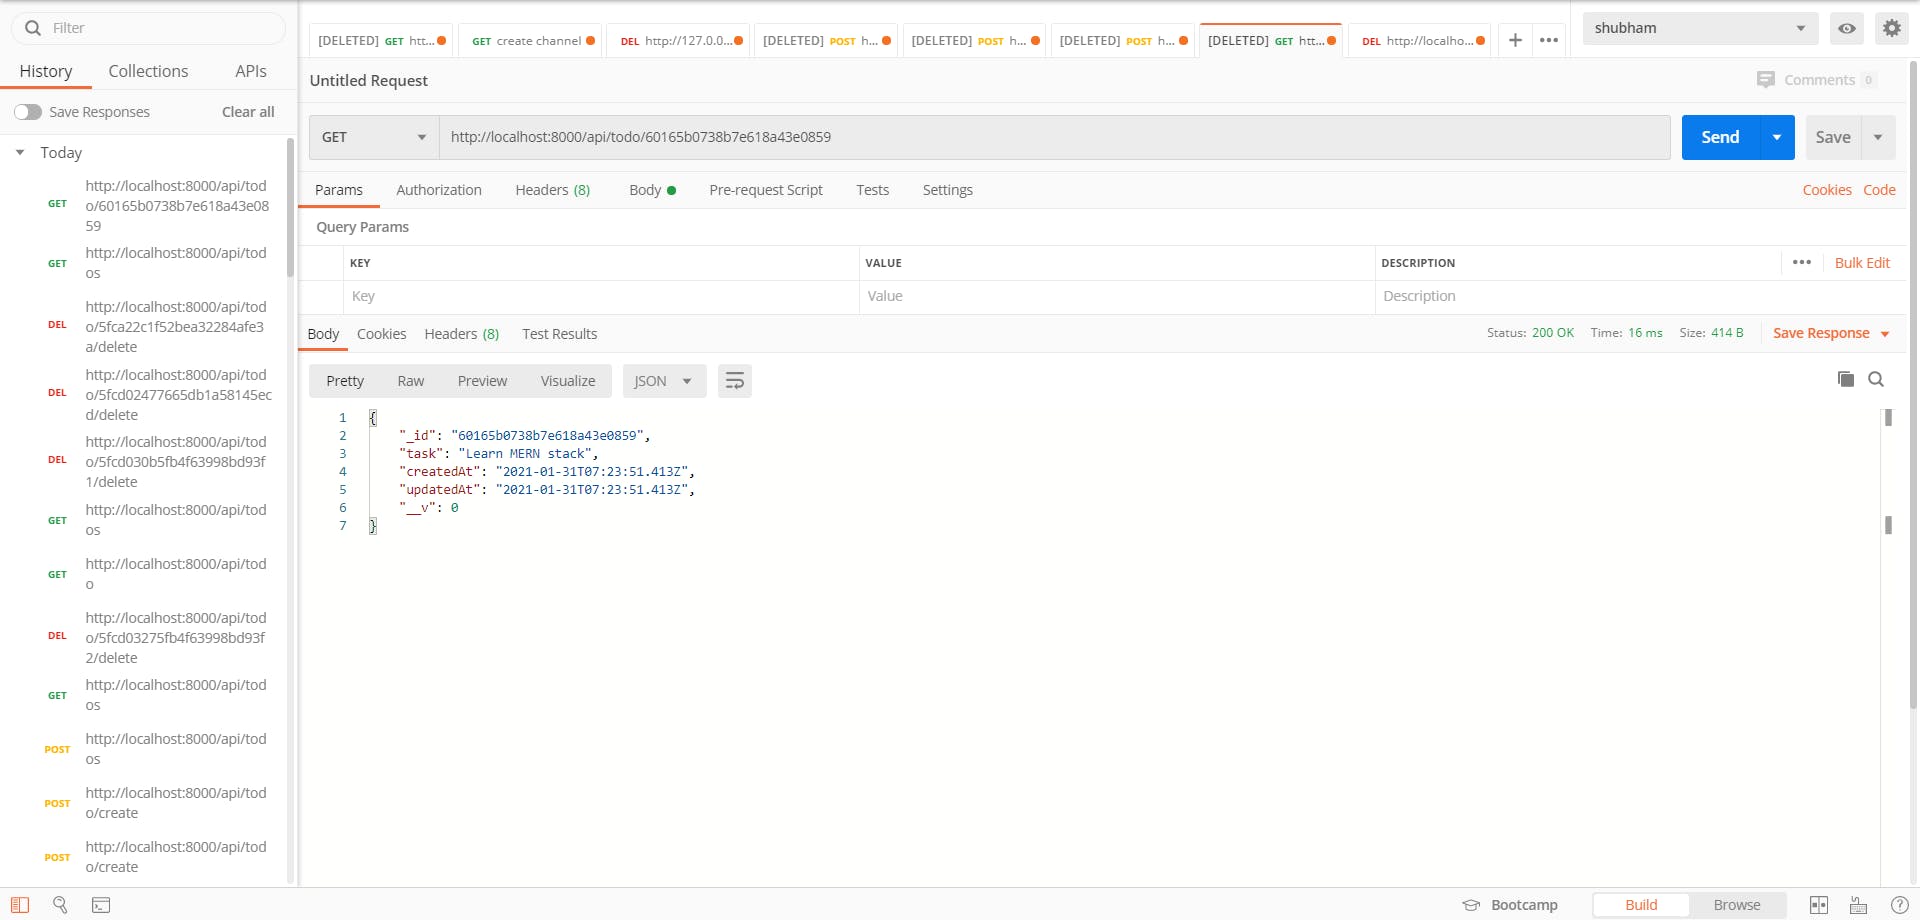 We are getting a todo from
 req.todo that getTodoById() middleware is releasing.
Function to create a todo:
exports.createTodo = (req, res) => {
  // we will get json data from the frontend i.e. req.body
  const todo = new Todo(req.body);

  // create a todo instance by passing 'task' field from 'req.body'
  todo.save((err, task) => {
    if (err || !task) {
      return res.status(400).json({
        error: "something went wrong",
      });
    }
    // todo is created
    // send the created todo as json response
    res.json({ task });
  });
};
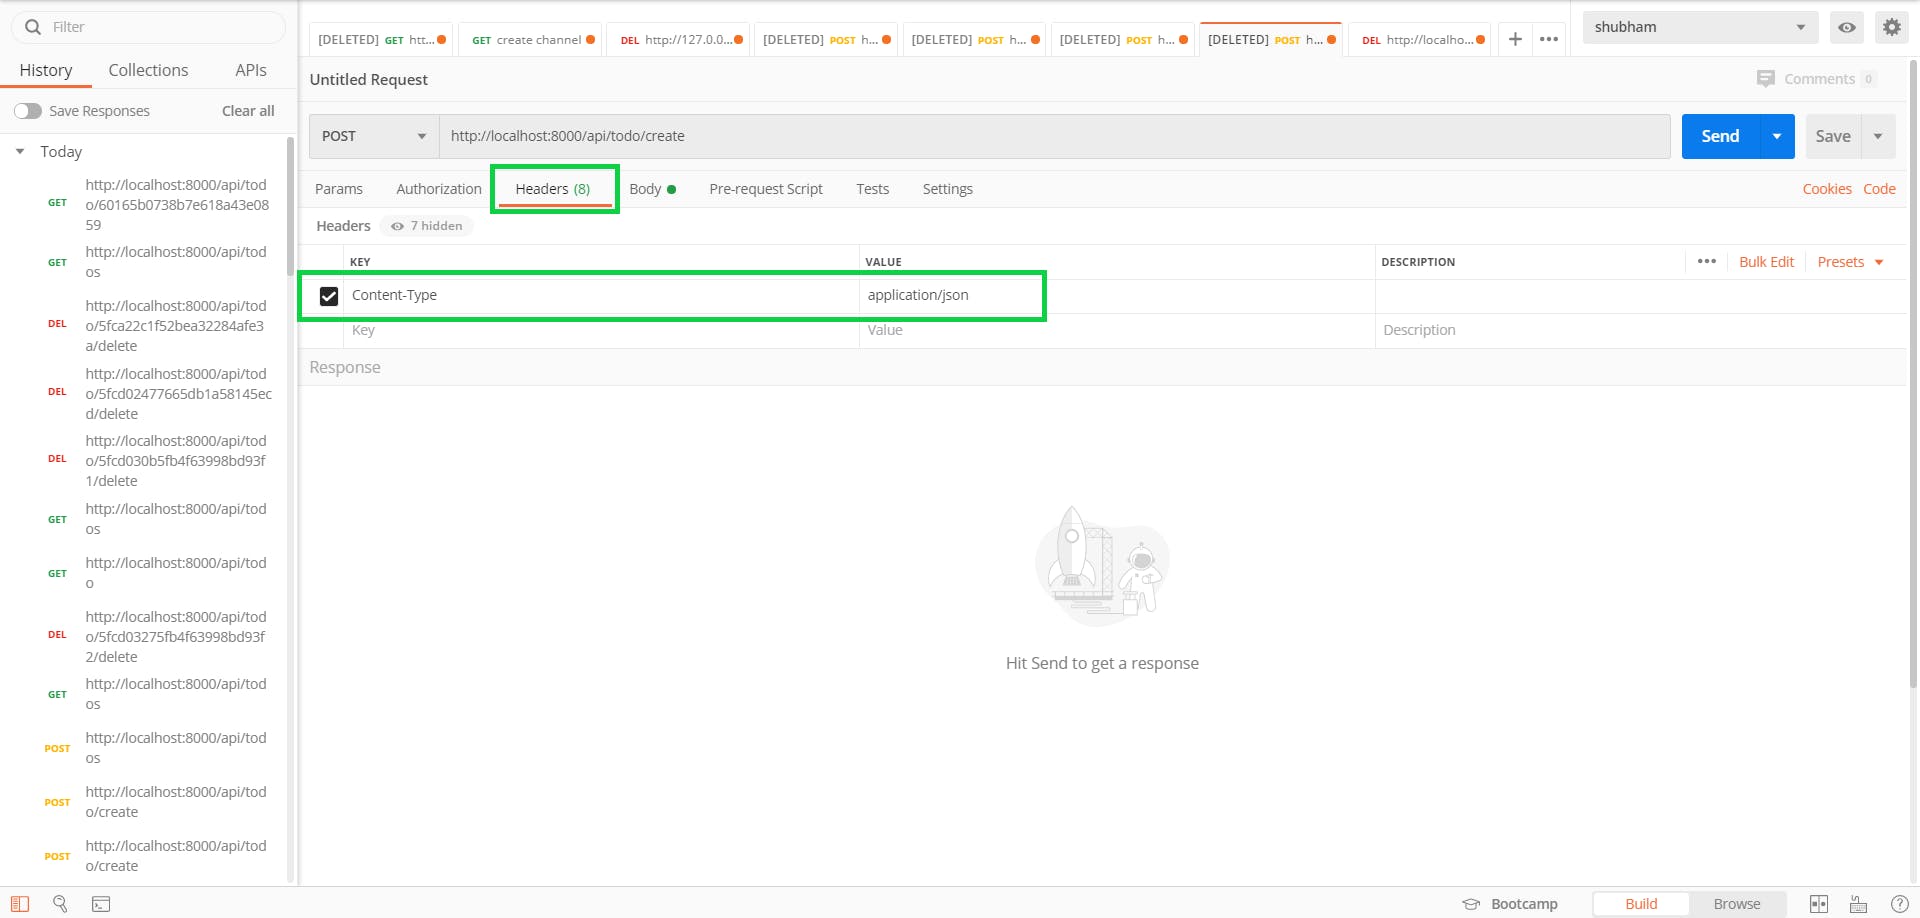
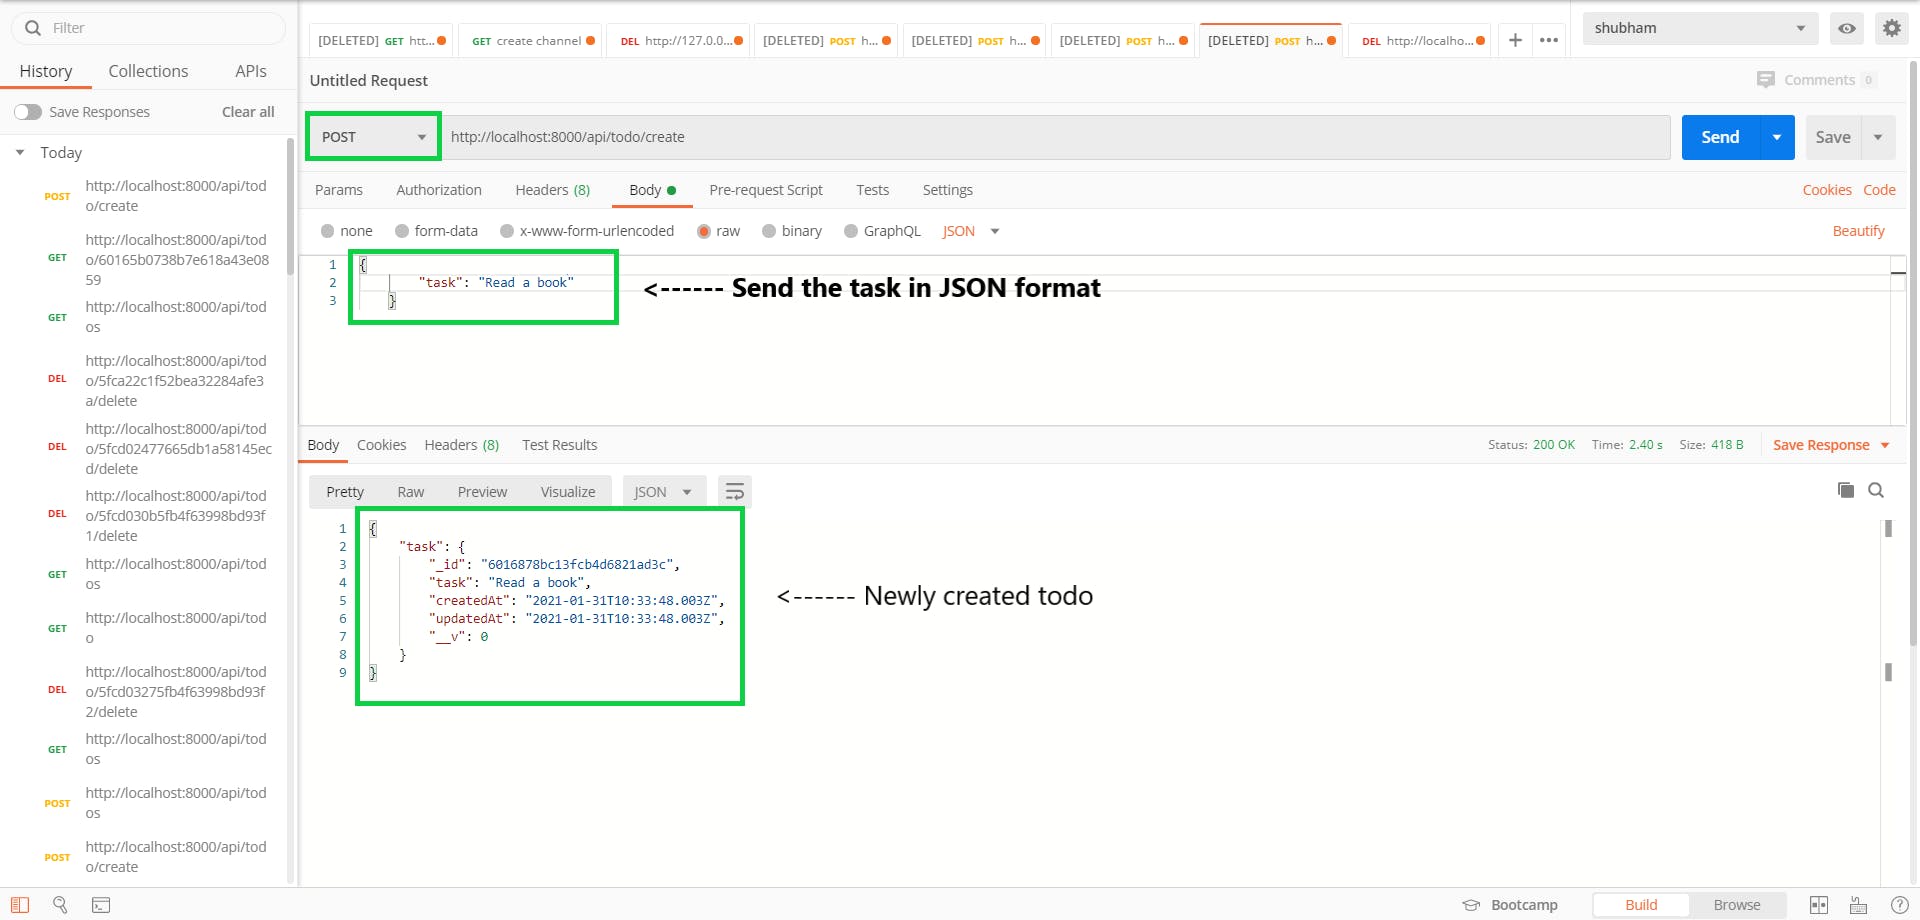
We have to send { "task": "<task_name">} as req.body to create a new todo. As we are sending the task in JSON format, we have to set the Content-Type header as application/json as shown below:
Let's hit http://localhost:8000/api/todo/create with the POST request and see if it creates the new todo:
 Now, let's hit
 http://localhost:8000/api/todos and see if we get newly created todo:
Function to update a todo:
exports.updateTodo = (req, res) => {
  // take req.todo from getTodoById() middleware and
  // fetch the todo that user wants to update
  const todo = req.todo;
  // simply change the task of the todo that user want to update by
  // the task that user has sent in req.body.task
  todo.task = req.body.task;

  // simply save that updated todo
  todo.save((err, t) => {
    if (err || !t) {
      return res.status(400).json({
        error: "something went wrong while updating",
      });
    }
    // send the updated todo as a json response
    res.json(t);
  });
};
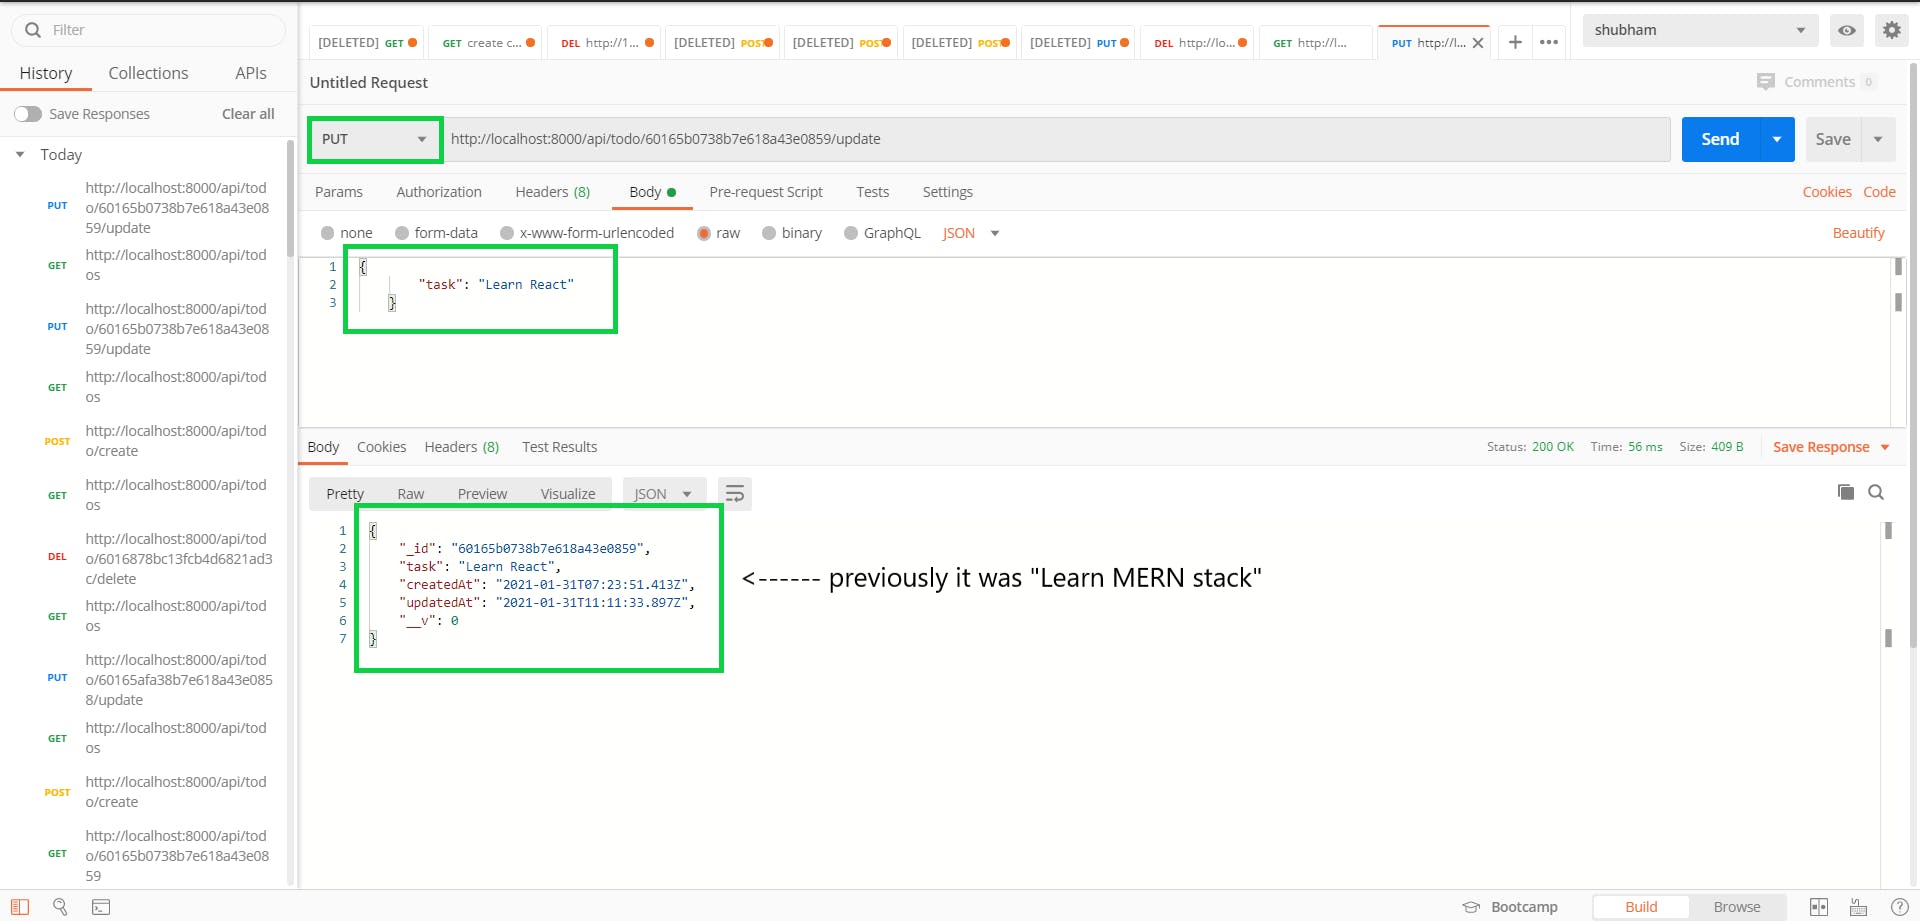
We have to send { "task": "<task_name">} as req.body to update a todo.
Let's hit http://localhost:8000/api/todo/:todoId/update with the PUT request and see if we can update the todo:
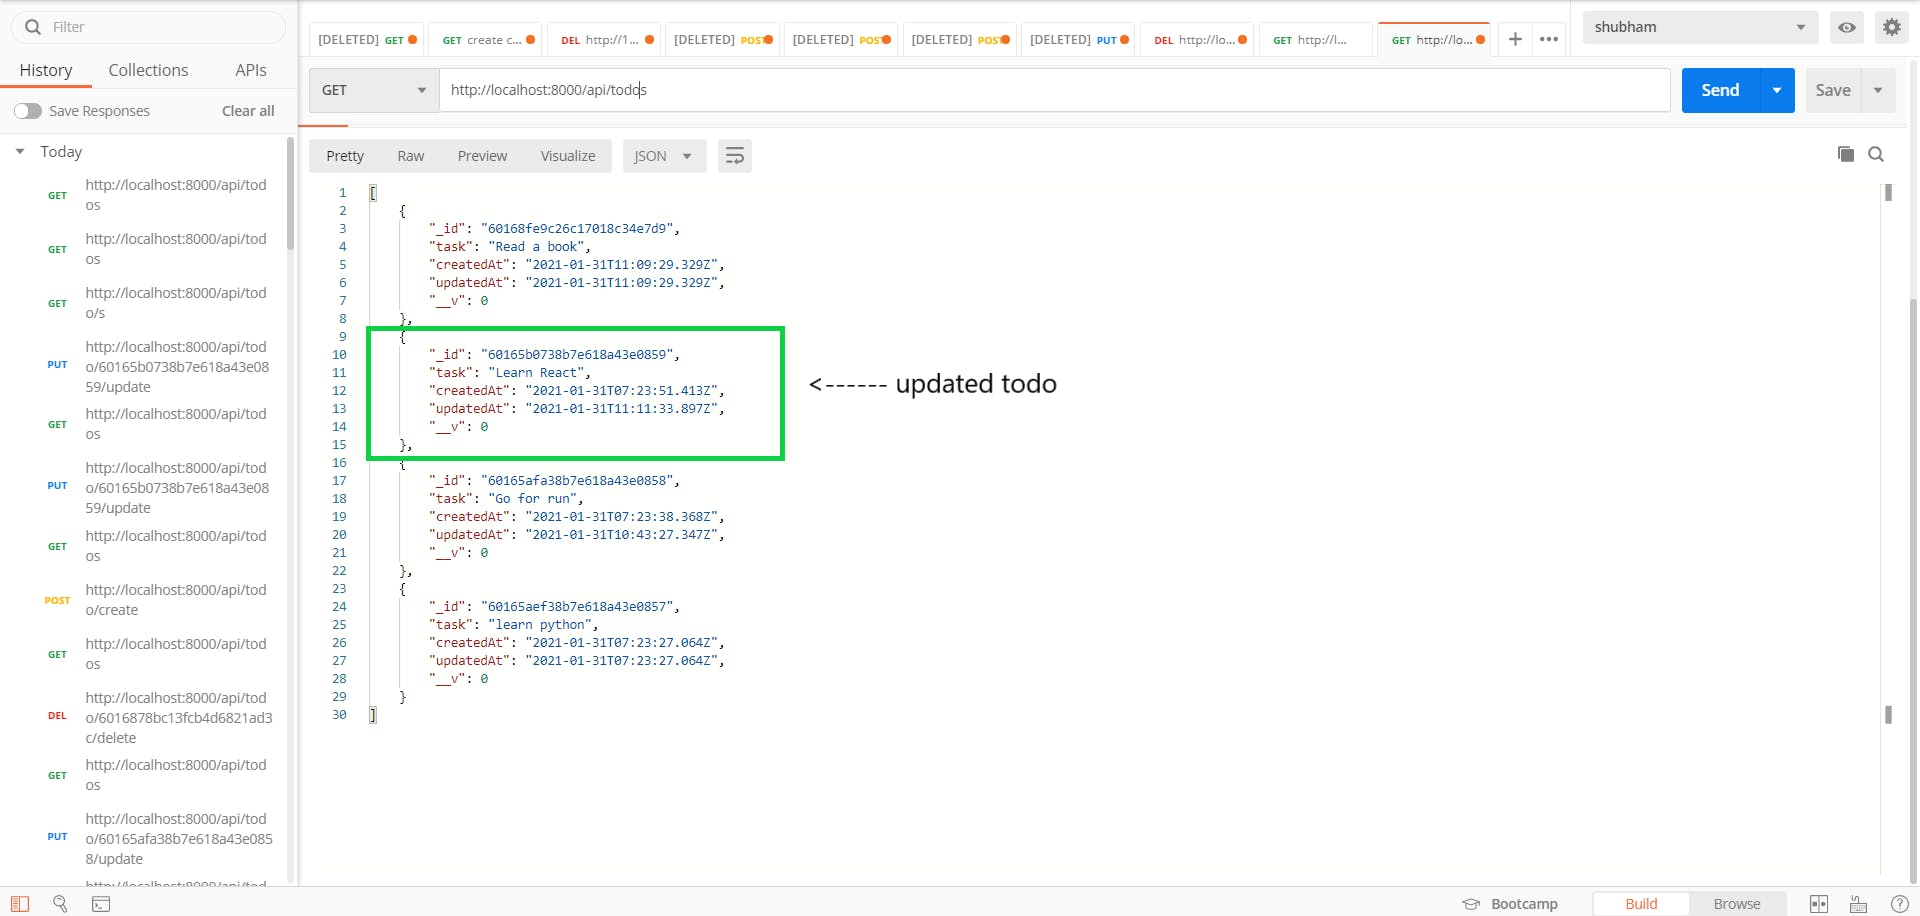
 Now, let's hit
 http://localhost:8000/api/todos and see if we get updated todo:
Function to delete a todo:
exports.deleteTodo = (req, res) => {
  // take req.todo from getTodoById() middleware and
  // fetch the todo that user wants to delete
  const todo = req.todo;
  // call .remove() method to delete it
  todo.remove((err, task) => {
    if (err || !task) {
      return res.status(400).json({
        error: "something went wrong while deleting the todo",
      });
    }
    // send deleted todo and success message as a json response
    res.json({
      task_deleted: task,
      message: "Todo deleted successfully!",
    });
  });
};
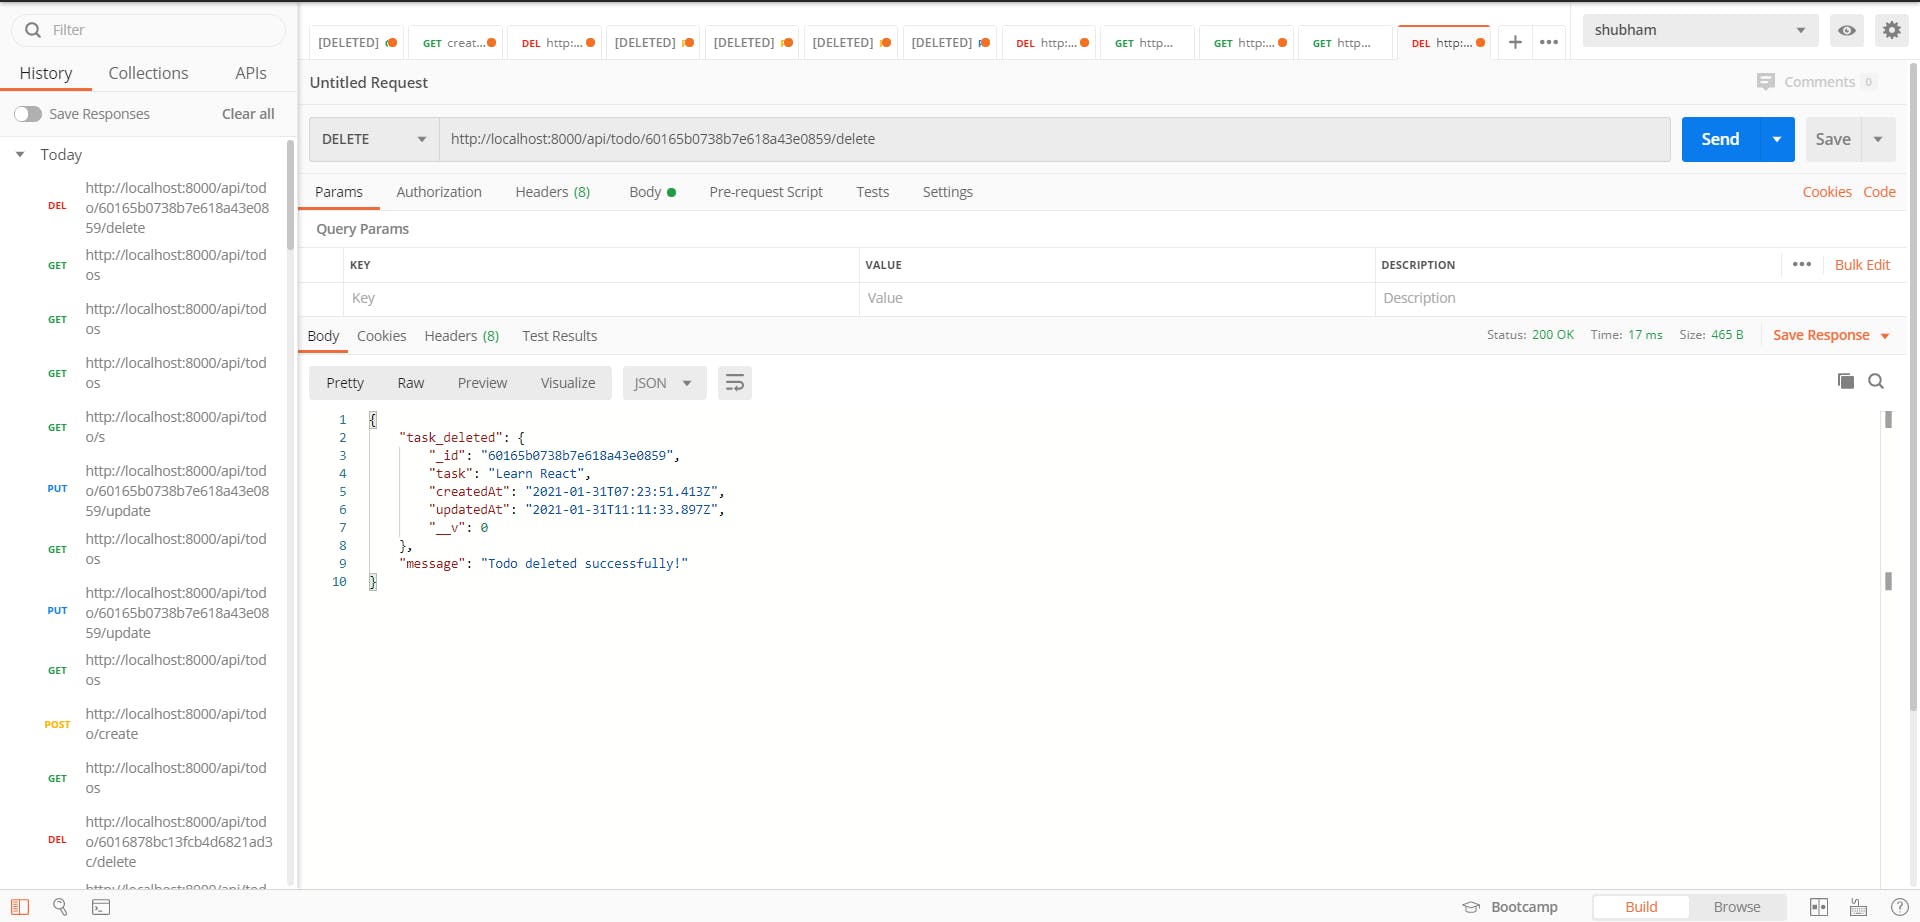
Let's hit http://localhost:8000/api/todo/:todoId/delete with the DELETE request and see if it deletes the todo:
 Now, let's hit
 http://localhost:8000/api/todos and see if we get deleted todo or not:
 There is no todo with
 "task": "Learn React"
With this, we come to an end of this article on Building Todo REST APIs with Node.js, Express, and MongoDB.
If you face any problem during this project, you can go ahead and check out the code on my Github.
Also, make sure to subscribe to our newsletter on blog.learncodeonline.in and never miss any upcoming articles related to programming just like this one.
I hope this post will help you in your journey. Keep learning!