Over the years we have been using APIs for many purposes. It is the medium of exchanging data between two applications or endpoints. In a typical client-server model, REST API is a popular name among developers. By exposing the REST API endpoints in a web server, we give control of the database to the client applications. REST APIs can be developed in almost all possible backend frameworks and languages.
A typical response from a REST API endpoint is always in JSON format. Now that is a major task for a backend developer to serialize or flatten the data coming from a model with complex relationships. We can build such things in Django totally from scratch but Django Rest Framework provides an excellent way of handling these things more easily. Also, there are authentication and permission issues with the exposed API endpoints, which Django Rest Framework (DRF) takes care of automatically.
Our Goal :
Today we will be creating a Word Counter application in Django and Django Rest Framework to expose REST API endpoints with Token Authentication.
Platform :
Throughout the article, I will share code examples keeping Windows OS in mind. But surely, all of the things can be done in Unix/Linux-based OSs as well. Steps will be similar, commands might be a little different in some cases in other operating systems.
What We Need :
- Python should be installed in the system
- Postman for testing the APIs
- Any code editor like VSCode, Sublime, Atom etc.
- Virtual Environment should be installed via pip.
Note: If you don't have Virtual Environment installed, fire
pip install virtualenv
in your terminal. It will install the virtual environment in your system.
Setup Virtual Env :
Now let's set up the virtual environment in which we are going to work. First, come to a directory where you want to keep your project files and open the terminal there. To create a virtual environment, fire this command below.
python -m venv venv
Now after this command gets successfully executed, you will see a folder named venv in your project directory. This venv contains all the virtual environment files and folders. Now we need to activate the virtual environment by firing this command
venv\Scripts\activate
Download Dependencies :
After the virtualenv is activated, you will see (venv) before the directory path in your terminal.
 Now, we need to download Django and Django-Rest-Framework. Fire the command below to download them.
pip install django djangorestframework
Once it gets completed, fire
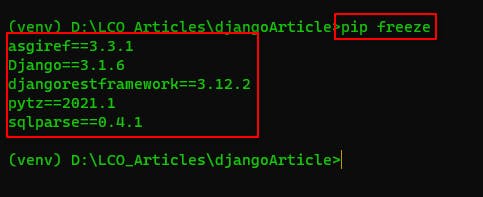
pip freeze
and match the library names from this below image, version numbers might be different as the packages might get updated in time.
 If everything looks good up to this point, then we can start our main project by creating it. So let's start!
Action Begins :
As the virtual environment is activated, and all the dependencies are downloaded, we can create our project wordcounter by firing
django-admin startproject wordcounter
It will create the wordcounter folder and the sample project template of Django into that folder. Let's move into the folder by firing
cd wordcounter
and then start the sample Django project by firing
python manage.py runserver
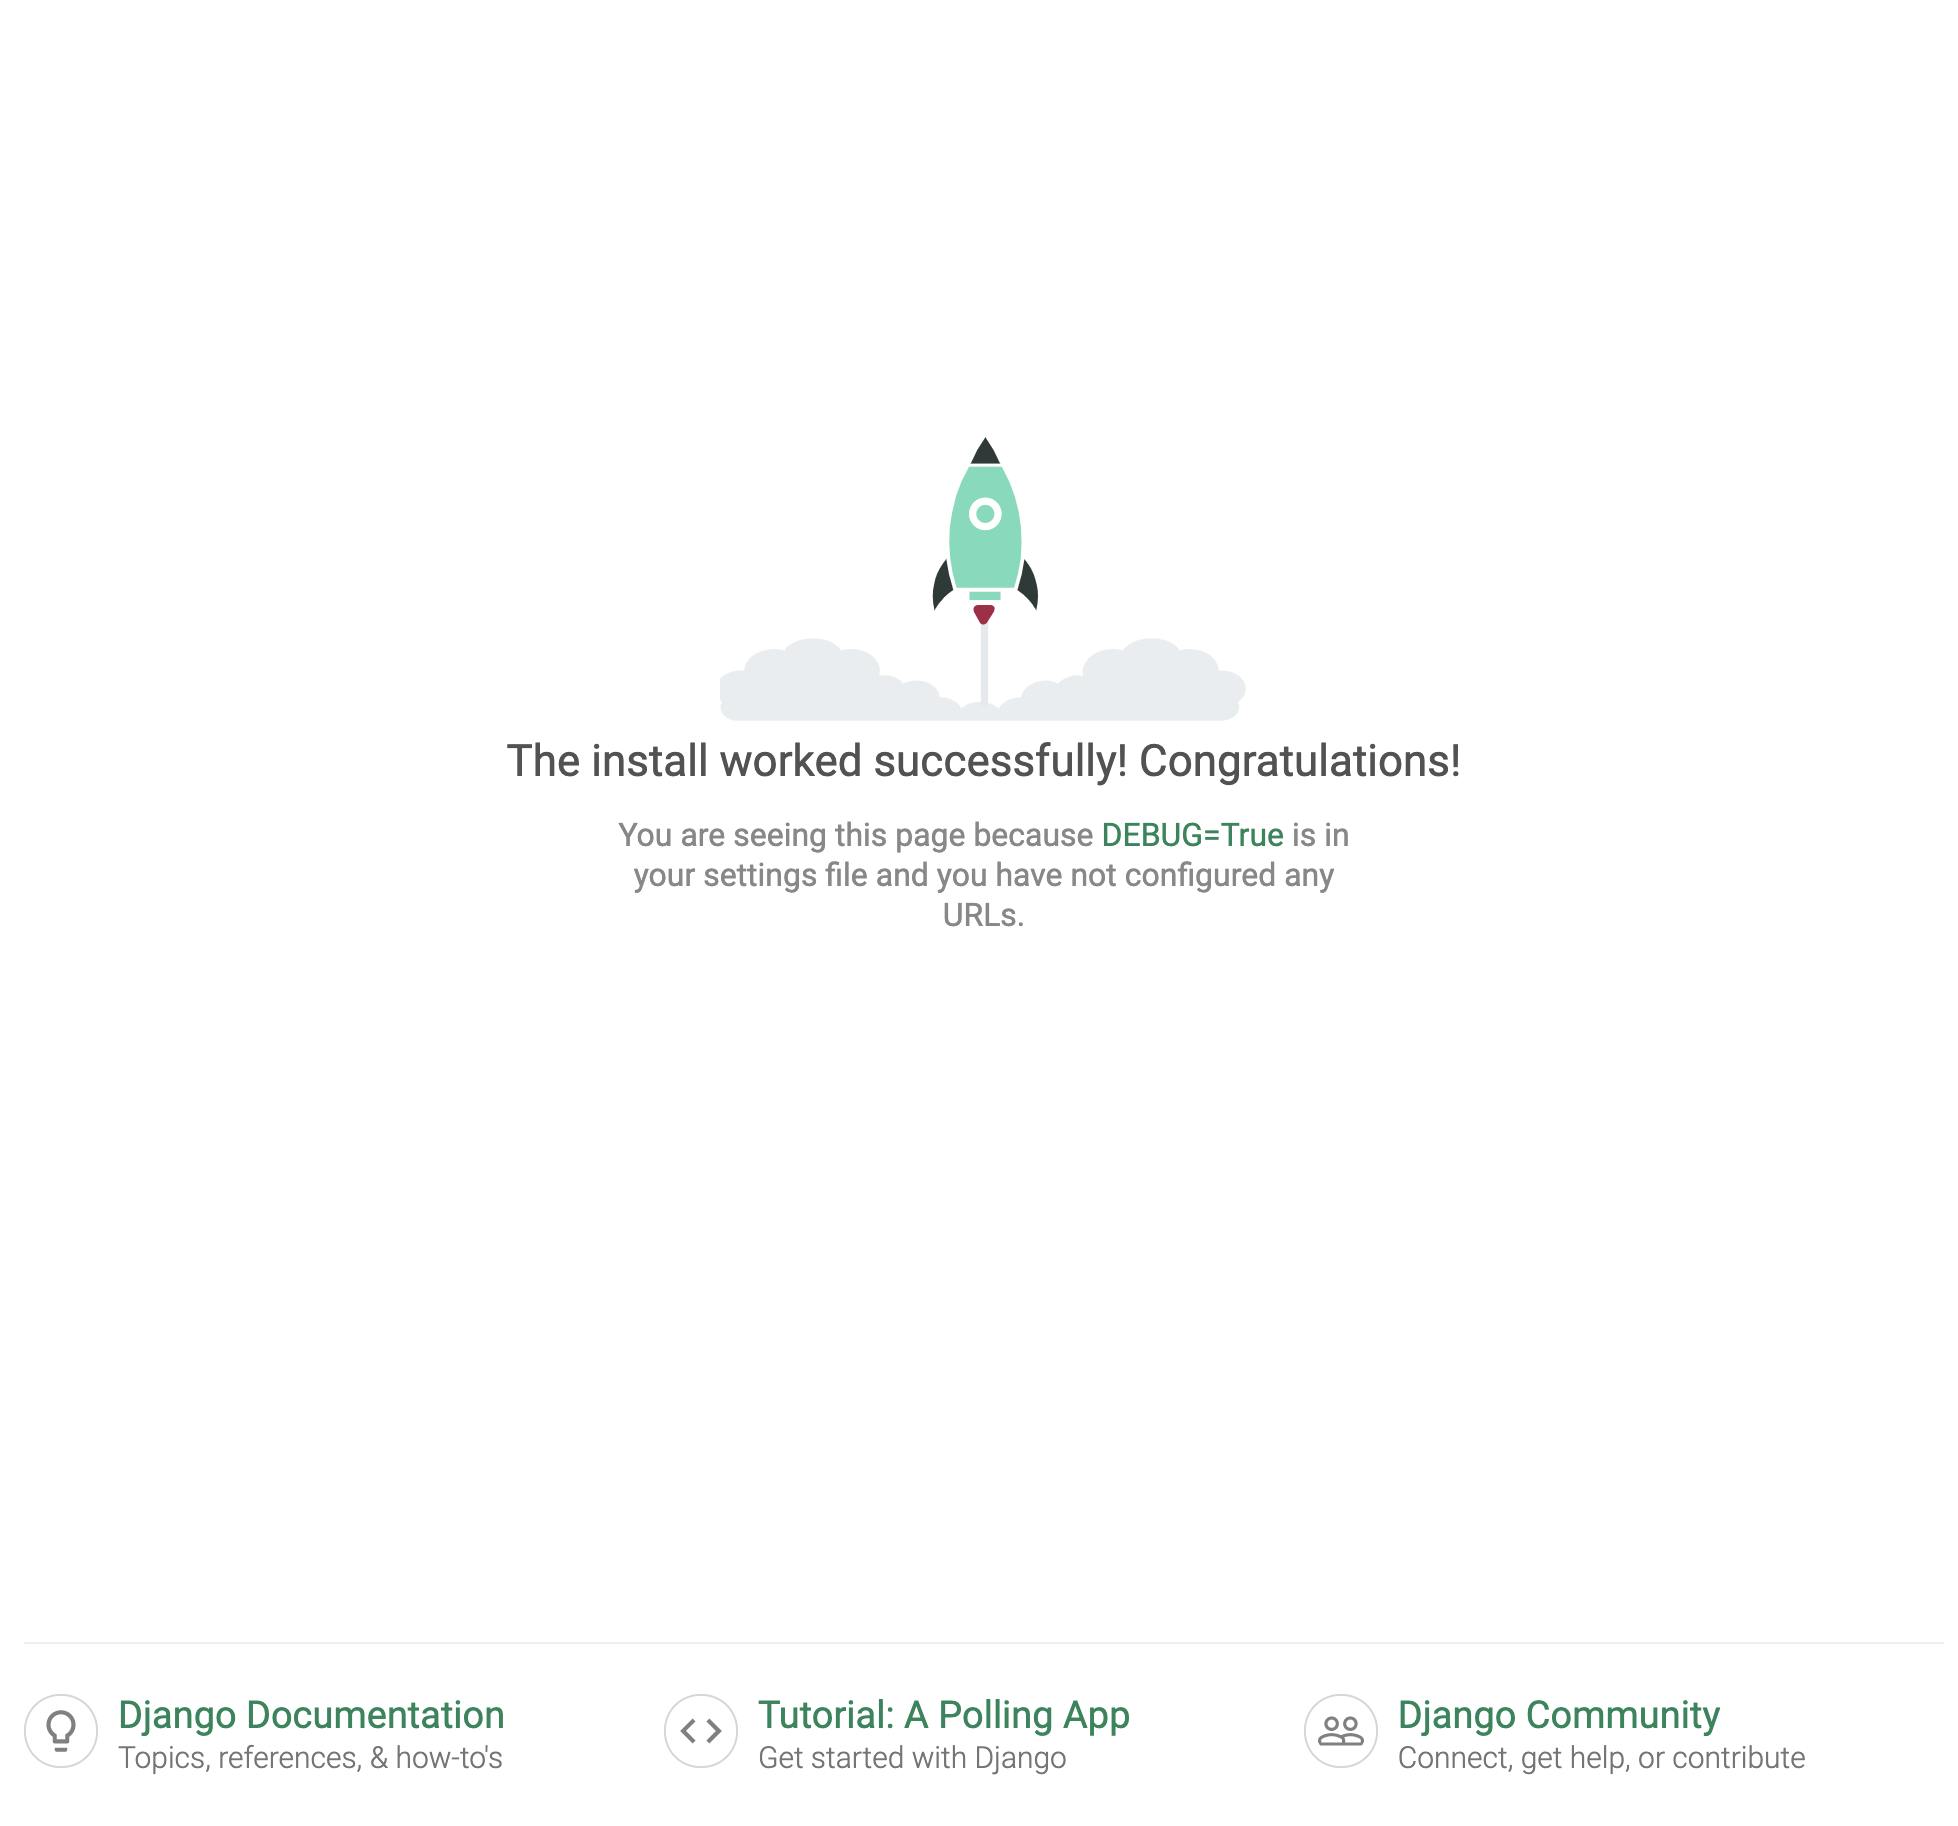
Now if you see a screen like below, that means your installation went successful and Django is running on http://127.0.0.1:8000
 Now close the server by pressing Ctrl+C in the terminal.
Now we need to create an app for our API-related routes. Create an api app in Django by firing
python manage.py startapp api
This will create api folder inside wordcounter and will contain all the sample files. So the project structure looks like this :
--wordcounter/
    |-- api/
        |-- __pycache__/
        |-- migrations/
        |-- __init__.py
        |-- admin.py
        |-- apps.py
        |-- models.py
        |-- tests.py
    |-- wordcounter/
        |-- __pycache__/
        |-- __init__.py
        |-- asgi.py
        |-- settings.py
        |-- urls.py
        |-- wsgi.py
    |-- db.sqlite3
    |-- manage.py
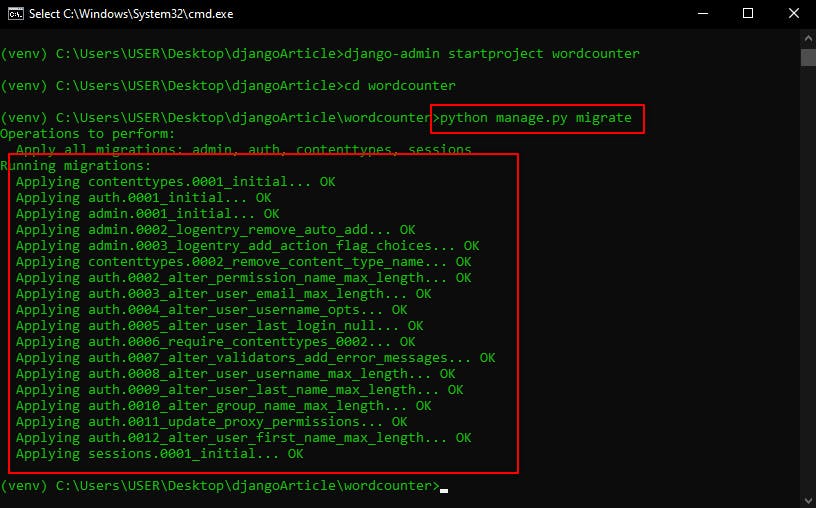
Now we need to migrate the DB and create a superuser for us. Stop (Ctrl+C) the server in terminal and fire
python manage.py migrate
It will look like this.
Now let's create a superuser for us by firing
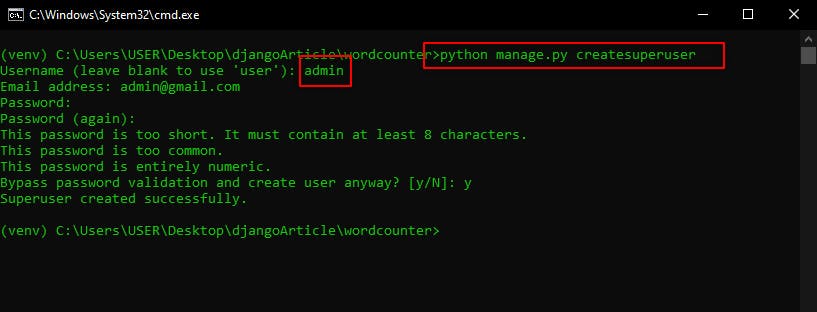
python manage.py createsuperuser
Enter valid credentials when asked and hit enter. Remember the username and password for your superuser. This is important to log into the admin panel of Django. Here I'm using admin as username. Here is the reference image below.
Great! Now we have created a superuser for us. But, before visiting the admin panel, we need to do a couple of things. We need to add this new app api in the INSTALLED_APPS list in settings.py. Lets add the following in settings.py.
INSTALLED_APPS = [
    'django.contrib.admin',
    'django.contrib.auth',
    'django.contrib.contenttypes',
    'django.contrib.sessions',
    'django.contrib.messages',
    'django.contrib.staticfiles',
    # Here it is
    'api',
]
Now, we have to create a model and migration for our api app and migrate it. So let's begin by creating a model class for api app. In api/models.py, write :
from django.db import models


class Counter(models.Model):

    text = models.TextField()

    total_words = models.PositiveIntegerField(default=0)
There will be two fields in our table. The text field is for the incoming text in API param, total_words is the counted words of that text by our app.
Let's create a migration for it, and migrate it to DB.
python manage.py makemigrations
It will look like the following.
 After this, we need to again fire migrate.
python manage.py migrate
This command will finally create the table into the DB.
Now register this app to the admin panel of Django, by adding these lines into the /api/admin.py file.
from django.contrib import admin
from .models import Counter
# Register your models here.

admin.site.register(Counter)
All set to open the admin panel of Django!
Restart the Django-Server in the terminal and open 127.0.0.1:8000/admin in your browser, enter superuser credentials that we created before. You'll see something like this.
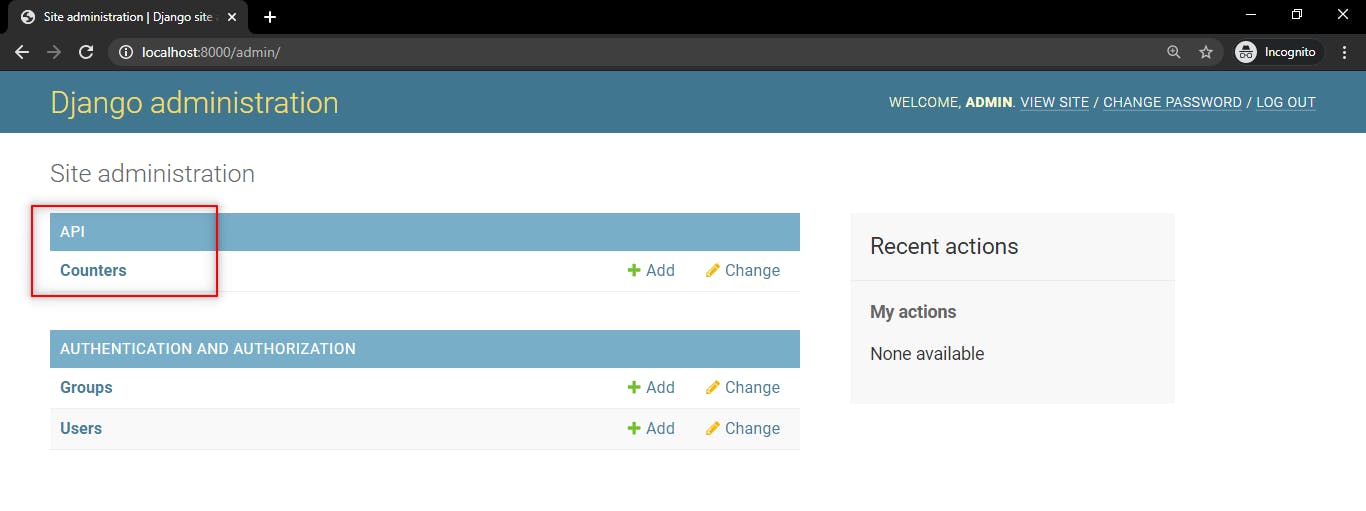 So our Model is registered with Django Admin Panel. You can check and create sample values for our table directly in the admin panel.
Implement Token Authentication :
Now, as we have already set up the basic project structure, now let's begin with implementing token-based authentication for our API.
Let's modify the settings.py file first. We need to add two more apps to the INSTALLED_APPS list. It will finally look like this.
INSTALLED_APPS = [
    'django.contrib.admin',
    'django.contrib.auth',
    'django.contrib.contenttypes',
    'django.contrib.sessions',
    'django.contrib.messages',
    'django.contrib.staticfiles',
    'rest_framework',
    'rest_framework.authtoken',
    'api',
]
Also, at the bottom of the file, we need to add these lines.
REST_FRAMEWORK = {
    'DEFAULT_AUTHENTICATION_CLASSES': [
        'rest_framework.authentication.TokenAuthentication',
    ],
    'DEFAULT_PERMISSION_CLASSES': [
        'rest_framework.permissions.IsAuthenticatedOrReadOnly',
    ]
}
What this will do is, it will set the authentication and permission type for our APIs globally.
Now we have to migrate again to create the default table from rest_framework.authtoken for storing the auth-tokens. Fire migrate command from above.
Let's configure URLs for generating the auth-tokens for a user. Open wordcounter/urls.py and add these lines.
from django.contrib import admin
from django.urls import path, include

urlpatterns = [
    path('admin/', admin.site.urls),
    path('', include('api.urls'))
]
Now create an urls.py file in the api folder and add these lines.
from django.urls import path
from .views import *
from rest_framework.authtoken.views import obtain_auth_token
from rest_framework.urlpatterns import format_suffix_patterns


urlpatterns = [
    path('', index),
    path('api-token-auth/', obtain_auth_token, name='api_token_auth'),
]

urlpatterns = format_suffix_patterns(urlpatterns)
Now create a views.py file in api folder and add these lines.
from django.http import JsonResponse

def index(request):
    return JsonResponse({'info':'Count Word API v1', 'developer':'Sam'})
Now, Restart the Django server. Open Postman and make a POST request to this URL 127.0.0.1:8000/api-token-auth with the request body containing the superuser credentials like this.
{
    "username" : "admin",
    "password" : "123"
}
It will give you the auth-token for the registered user in the response like this.
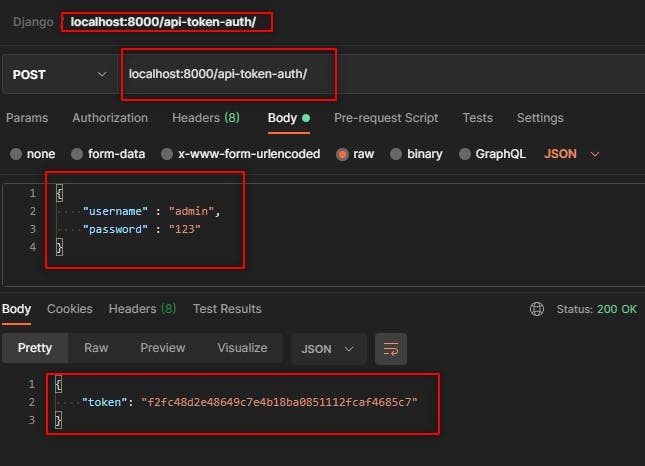
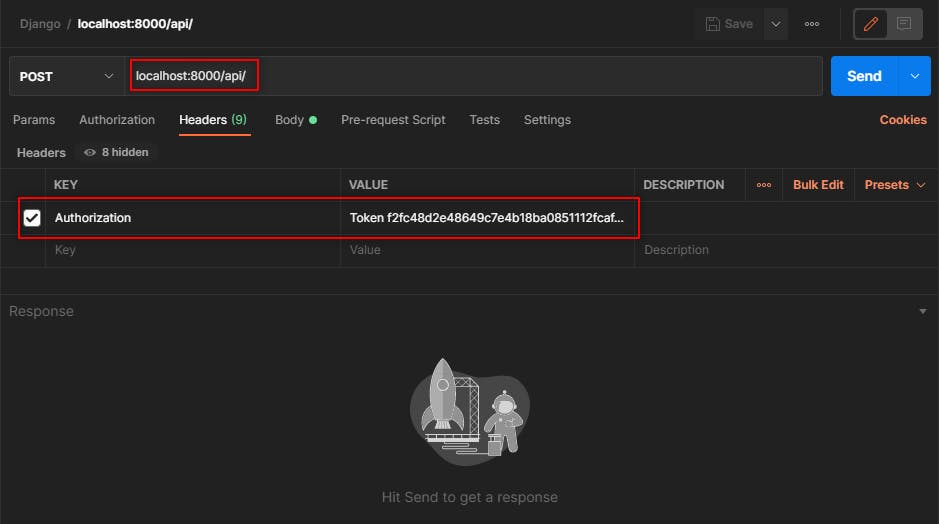
Cheers! We implemented the token-based auth system for our APIs. Every time we call an API route, we have to pass this token in the Authorization header to authenticate the user.
Now the final part, building the APIs. Let's finish this.
Implement REST APIs :
Building REST APIs is very simple in Django Rest Framework, but as we are implementing a little customization to our project like counting the words based on param text in the request body, so there will be a couple of tasks for us.
Let's proceed by creating a Serializer class. Serializers are the main reason to use Django Rest Frameworks (DRF) for creating REST APIs. All the data, coming from DB tables with complex relations are a bit nastier in format. So to flatten the data in a plain JSON format and send it as an API response, Serializers come into play! So it's a bridge between the DB output from the models and API responses.
Let's create a file serializers.py in the api folder and add the following.
from rest_framework import serializers

from .models import Counter

class CounterSerializer(serializers.ModelSerializer):

    class Meta:

        model = Counter

        fields = ('id', 'text', 'total_words')
Now let's configure our final API URLs in the urls.py file of the api folder. Modify the file like this.
from django.urls import path
from .views import *
from rest_framework.authtoken.views import obtain_auth_token
from rest_framework.urlpatterns import format_suffix_patterns


urlpatterns = [
    path('', index),
    path('api/', count_word),
    path('api/<int:pk>/', count_word_each),
    path('api-token-auth/', obtain_auth_token, name='api_token_auth'),
]

urlpatterns = format_suffix_patterns(urlpatterns)
After this, we need to finally write the core logic for counting the words of an API param in the views.py file in the api folder. Modify the views.py file and add these lines.
from django.shortcuts import render
from django.http import JsonResponse


from rest_framework import status
from rest_framework.parsers import JSONParser
from rest_framework.decorators import api_view
from rest_framework.response import Response

from .models import Counter
from .serializers import CounterSerializer


def index(request):
    return JsonResponse({'info':'Count Word API v1', 'developer':'Samprit Sarkar'})


@api_view(['GET', 'POST'])
def count_word(request):
    if request.method == 'GET':

        data = Counter.objects.all()

        serializer = CounterSerializer(data, many=True)

        return Response(serializer.data, status=status.HTTP_200_OK)

    elif request.method == 'POST':

        if not 'text' in request.data.keys():
            return Response({'detail':'No text parameter found.'}, status=status.HTTP_404_NOT_FOUND)

        data = request.data

        text_data = data['text']

        no_of_words = len(text_data.split())

        data['total_words'] = no_of_words

        serializer = CounterSerializer(data=data)

        if serializer.is_valid():
            serializer.save()
            return Response(serializer.data, status=status.HTTP_201_CREATED)

        return Response(serializer.errors, status=status.HTTP_400_BAD_REQUEST)


@api_view(['GET', 'PUT', 'DELETE'])
def count_word_each(request, pk):

    try:
        record = Counter.objects.get(pk=pk)

    except Counter.DoesNotExist:
        return Response({'detail':'No such record exists.'}, status=status.HTTP_404_NOT_FOUND)

    if request.method == 'GET':
        serializer = CounterSerializer(record)
        return Response(serializer.data, status=status.HTTP_200_OK)

    elif request.method == 'PUT':

        if not 'text' in request.data.keys():
            return Response({'detail':'No text parameter found.'}, status=status.HTTP_404_NOT_FOUND)

        data = request.data

        text_data = data['text']

        no_of_words = len(text_data.split())

        data['total_words'] = no_of_words

        serializer = CounterSerializer(record, data=data)

        if serializer.is_valid():
            serializer.save()
            return Response(serializer.data, status=status.HTTP_201_CREATED)
        return Response(serializer.errors, status=status.HTTP_400_BAD_REQUEST)

    elif request.method == 'DELETE':
        record.delete()
        return Response({'detail':'Record Deleted'}, status=status.HTTP_200_OK)
So the final project structure looks something like this.
--wordcounter/
    |-- api/
        |-- __pycache__/
        |-- migrations/
        |-- __init__.py
        |-- admin.py
        |-- apps.py
        |-- models.py
        |-- tests.py
        |-- serializers.py
        |-- urls.py
        |-- views.py
    |-- wordcounter/
        |-- __pycache__/
        |-- __init__.py
        |-- asgi.py
        |-- settings.py
        |-- urls.py
        |-- wsgi.py
    |-- db.sqlite3
    |-- manage.py
Now the final part, test our API endpoint with some sample data in Postman. Remember to send the login token in the Authorization header otherwise, it won't work. Reference image below to send the login token.
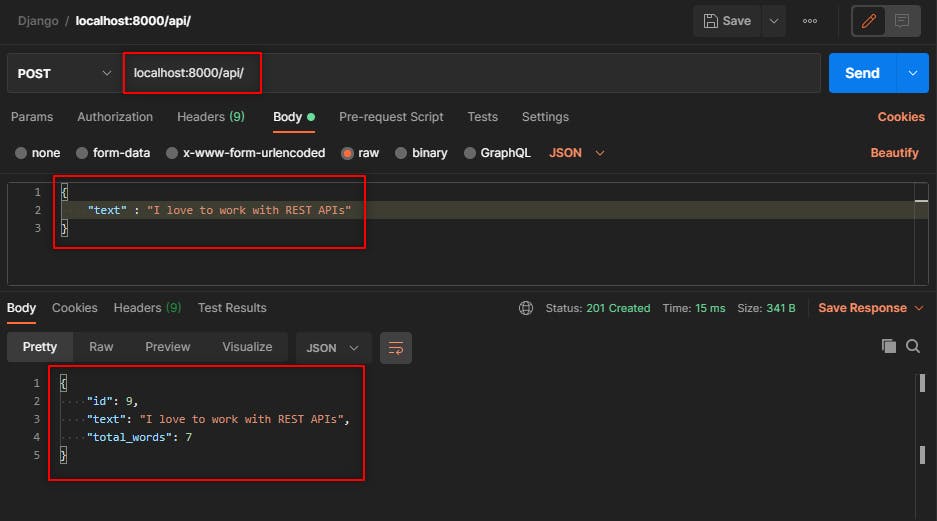
A sample test for the POST route of this API will look like this.
All the project files are hosted here in my Github
Congratulations!! You made it till the last. I hope you gained something here today and reading it was worth the time. Keep working on REST APIs on different frameworks and explore more about them just like I do always. Good Luck.
