


Introduction
When it comes to deploying Kubernetes cluster for the first time I always prefer doing it the manual way. You must be surprised why so! The reason is when you want to learn any technology or tool you should always approach it in a step by step manner. By doing that you will have all the concepts clear in your mind.
Unattended or silent installations can be configured and implemented later once you you have clear understanding of all the steps needs to be followed.
You can follow this tutorial and learn how to deploy a Production ready Kubernetes cluster on Ubuntu 20.04 LTS.
Prerequisites
Following are the prerequisites when you want to deploy a Kubernetes cluster.
Prepare your environment
You can setup Kubernetes cluster on bare metal, virtual machines or on any cloud platforms such as AWS, Azure, GCP and so on.
Here I have 3 Ubuntu 20.04 LTS VM's running with following configuration:

Configure hostnames correctly on all the nodes
In case you don’t have your DNS server configured then update /etc/hosts file on master and all the worker nodes.
For your reference I will paste my /etc/hosts file content from the master node.
root@kube-master-ub:~# cat /etc/hosts
127.0.0.1       localhost
172.24.24.100   kube-master-ub.example.com         kube-master-ub
172.24.24.101   kube-worker-ub1.example.com        kube-worker-ub1
172.24.24.102   kube-worker-ub2.example.com        kube-worker-ub2
root@kube-master-ub:~#
Turn the swap off on all the nodes
You would ask that why we need to turn off the swap on Kubernetes nodes ?
The answer is because Kubernetes scheduler determines the best available node on which to deploy newly created pods. If memory swapping is allowed to occur on a host system, this can lead to performance and stability issues within Kubernetes. For this reason, Kubernetes requires that you disable swap in the host system.
swapoff -a && sed -i '/ swap / s/^/#/' /etc/fstab
You need to run this on all the nodes (Master + Workers)
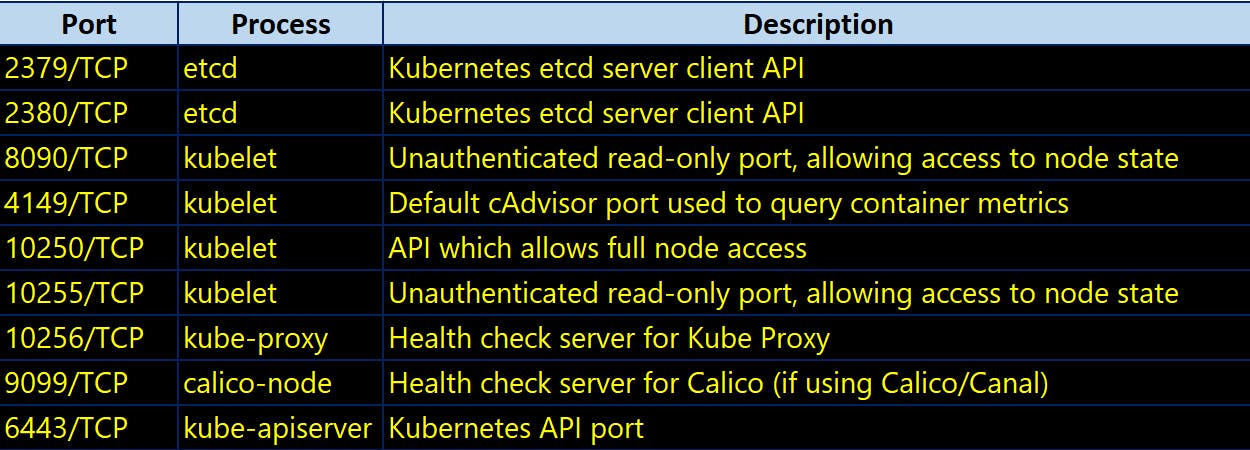
Enable Firewall rules
By default there is no blocking firewall rules configured at host level. Hence if you are following my tutorial here you don’t need to edit firewall rules.
Here is the common ports list:
Begin the cluster deployment
Once you are done with configurations part of prerequisites follow the steps below one after another.
STEP 1: Configure Docker Repository
Kubernetes requires container runtime installed on each node part of the cluster which can handle the process of running containers on a machine. Container runtime is the software responsible for running containers.
There are several common container runtimes we can use such as:
- containerd
- CRI-O
- Docker
Kubernetes recently deprecated docker support starting from version 1.20 and will continue to use other container runtimes. But Docker is still the preferable tool to develop and build container images and running them locally.
This step needs to be performed on the Master Node, and each Worker Node.
Update the package index and install packages to allow apt to use a repository over HTTPS:
apt-get update -y

apt-get install  apt-transport-https  ca-certificates  curl gnupg  lsb-release -y
Add Docker’s official GPG key:
curl -fsSL https://download.docker.com/linux/ubuntu/gpg | sudo gpg --dearmor -o /usr/share/keyrings/docker-archive-keyring.gpg
Add Docker repository:
 echo \
  "deb [arch=amd64 signed-by=/usr/share/keyrings/docker-archive-keyring.gpg] https://download.docker.com/linux/ubuntu \
  $(lsb_release -cs) stable" | sudo tee /etc/apt/sources.list.d/docker.list > /dev/null

STEP 2: Configure Kubernetes Repository
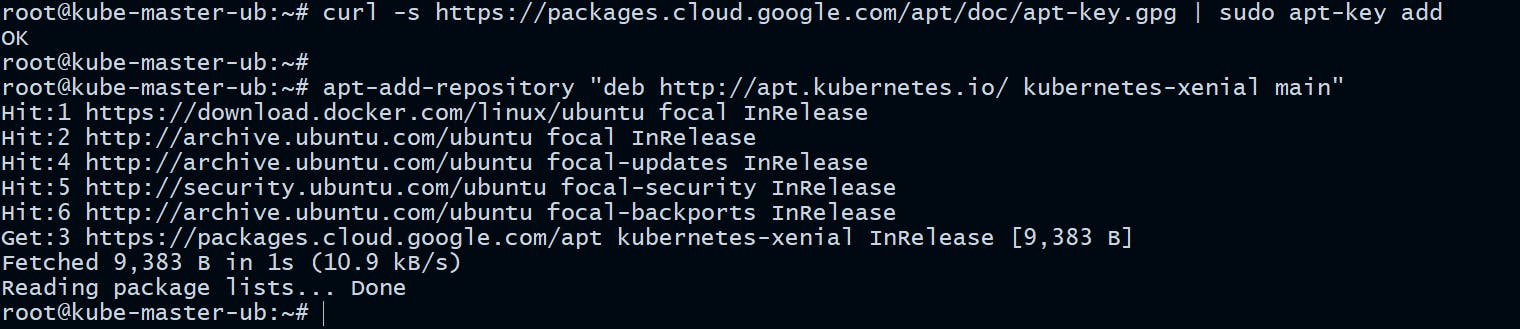
Add Kubernetes Signing Key:
curl -s https://packages.cloud.google.com/apt/doc/apt-key.gpg | sudo apt-key add
Add Kubernetes official repository:
apt-add-repository "deb http://apt.kubernetes.io/ kubernetes-xenial main"
You need to run this on all the nodes (Master + Workers)
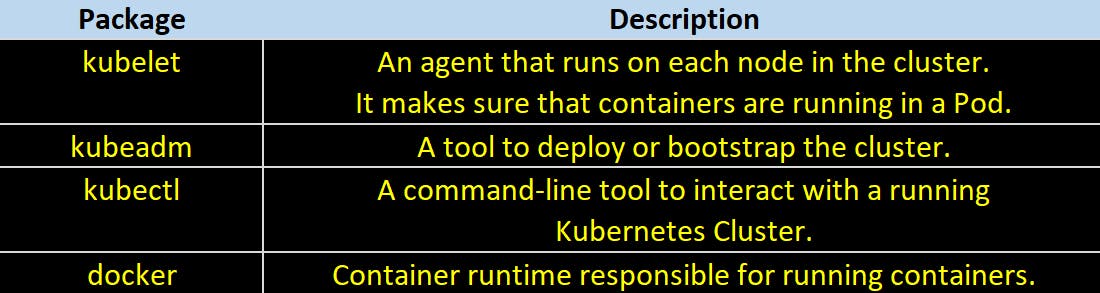
STEP 3: Install kubelet, kubeadm, kubectl and docker
These 3 basic packages along with container runtime which is docker here are required to be able to use Kubernetes.
Install the following packages on each node:
apt-get install -y kubelet kubeadm kubectl docker.io
Verify the package installation and versions:
kubectl version:
root@kube-master-ub:~# kubectl version
Client Version: version.Info{Major:"1", Minor:"21", GitVersion:"v1.21.1", GitCommit:"5e58841cce77d4bc13713ad2b91fa0d961e69192", GitTreeState:"clean", BuildDate:"2021-05-12T14:18:45Z", GoVersion:"go1.16.4", Compiler:"gc", Platform:"linux/amd64"}
kubeadm version:
root@kube-master-ub:~# kubeadm version
kubeadm version: &version.Info{Major:"1", Minor:"21", GitVersion:"v1.21.1", GitCommit:"5e58841cce77d4bc13713ad2b91fa0d961e69192", GitTreeState:"clean", BuildDate:"2021-05-12T14:17:27Z", GoVersion:"go1.16.4", Compiler:"gc", Platform:"linux/amd64"}
kubelet version:
root@kube-master-ub:~# kubelet --version
Kubernetes v1.21.1
docker client and server version:
root@kube-master-ub:~# docker version
Client:
 Version:           20.10.2
 API version:       1.41
 Go version:        go1.13.8
 Git commit:        20.10.2-0ubuntu1~20.04.2
 Built:             Tue Mar 30 21:24:57 2021
 OS/Arch:           linux/amd64
 Context:           default
 Experimental:      true

Server:
 Engine:
  Version:          20.10.2
  API version:      1.41 (minimum version 1.12)
  Go version:       go1.13.8
  Git commit:       20.10.2-0ubuntu1~20.04.2
  Built:            Mon Mar 29 19:10:09 2021
  OS/Arch:          linux/amd64
  Experimental:     false
 containerd:
  Version:          1.3.3-0ubuntu2.3
  GitCommit:
 runc:
  Version:          spec: 1.0.2-dev
  GitCommit:
 docker-init:
  Version:          0.19.0
  GitCommit:
You need to run this on all the nodes (Master + Workers)
STEP 4: Enable and start the docker service
Enable docker service to run ay boot time.
systemctl enable docker.service
Start the docker service.
systemctl start docker.service
You need to run this on all the nodes (Master + Workers)
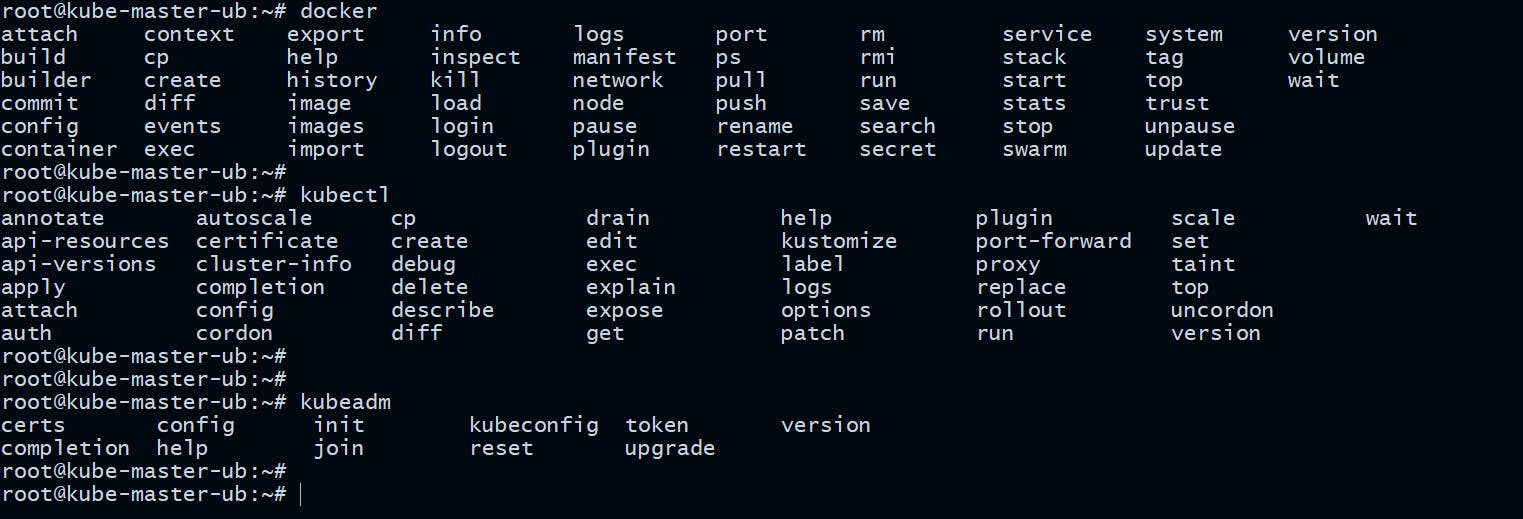
STEP 5: Enable bash completions
Enable bash completions on all the nodes so that you no need to manually type all the commands every time, the tab would do that for you.
apt-get install bash-completion -y

curl https://raw.githubusercontent.com/docker/docker-ce/master/components/cli/contrib/completion/bash/docker -o /etc/bash_completion.d/docker.sh

echo 'source <(kubectl completion bash)' >>~/.bashrc

kubectl completion bash >/etc/bash_completion.d/kubectl

echo 'source <(kubeadm completion bash)' >>~/.bashrc

kubeadm completion bash >/etc/bash_completion.d/kubeadm

logout
You need to run this on all the nodes (Master + Workers)
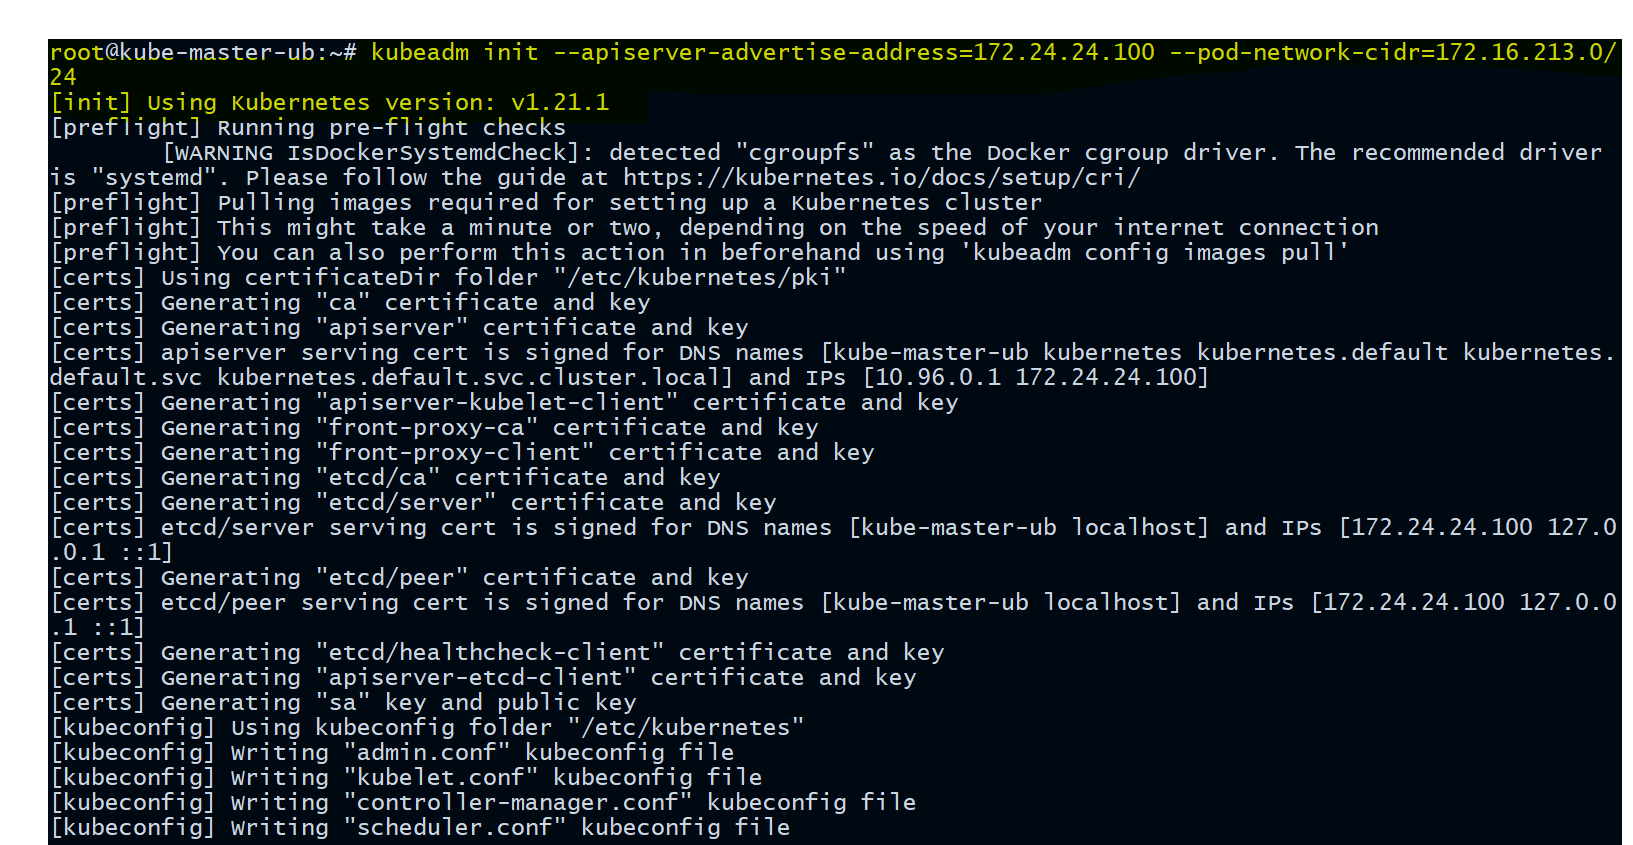
STEP 6: Create Cluster with kubeadm
It's time to initialize the cluster by executing the following command:
root@kube-master-ub:~# kubeadm init --apiserver-advertise-address=172.24.24.100 --pod-network-cidr=172.16.213.0/24
You need to run this on Master node
Its always good to set
--apiserver-advertise-addressspecifically while starting the Kubernetes cluster using kubeadm. If not set the default network interface will be used. The--apiserver-advertise-addresscan be used to set the advertise address for this particular control-plane node's API server.Same with
--pod-network-cidrSpecify range of IP addresses for the pod network. If set, the control plane will automatically allocate CIDRs for every node.For more options please refer this link.
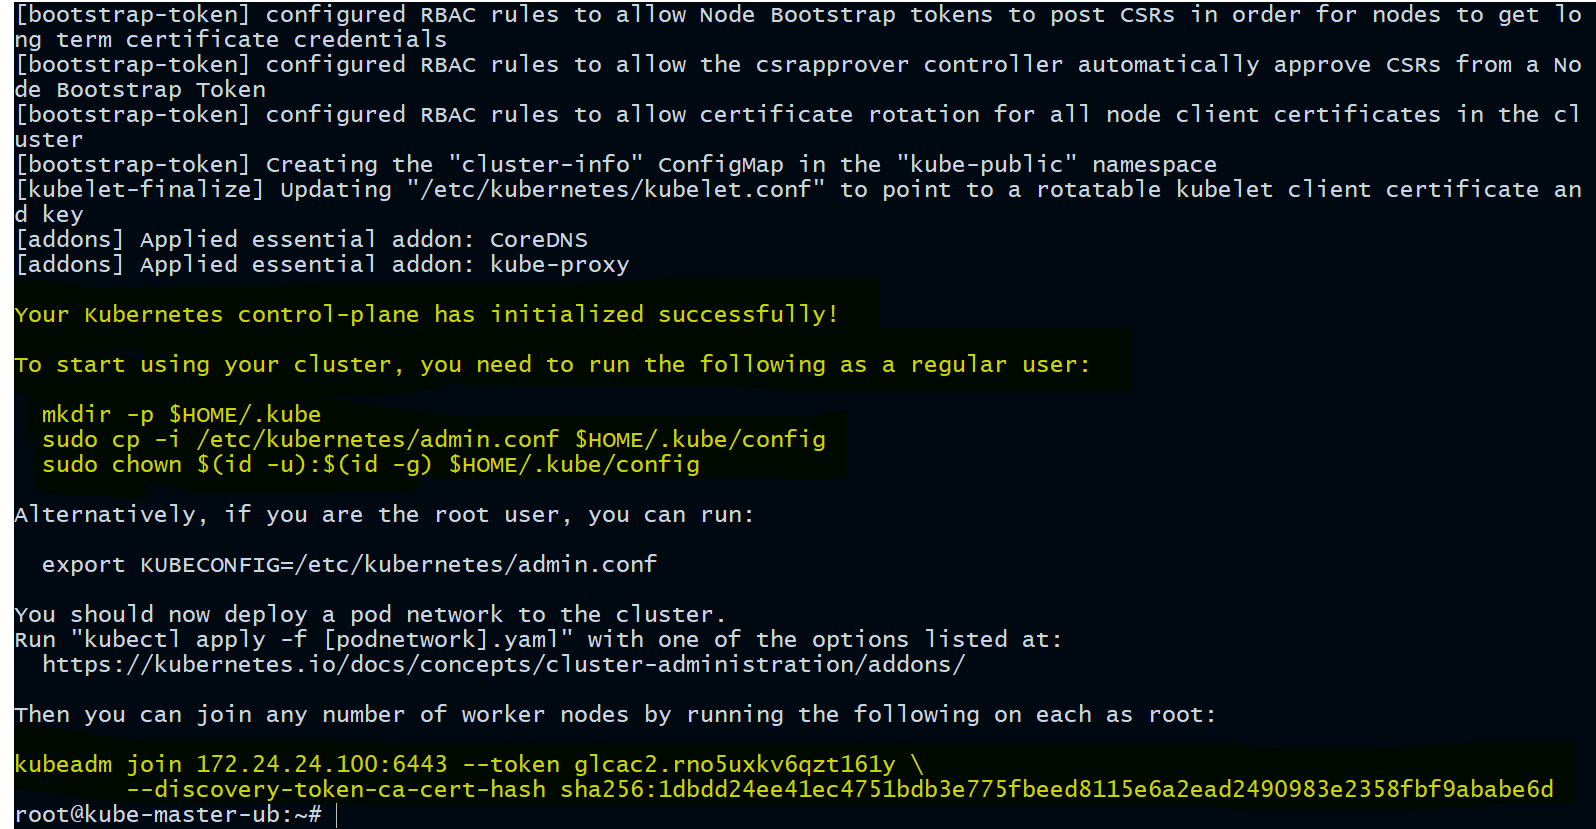
Manage cluster as a regular user:
In the above kubeadm init command output you can clearly see that to start using your cluster, you need to run the following commands as a regular user. The command for this step is given in the output of the previous command.
mkdir -p $HOME/.kube

cp -i /etc/kubernetes/admin.conf $HOME/.kube/config

chown $(id -u):$(id -g) $HOME/.kube/config

You need to run this on Master node
STEP 7: Setup Cluster Networking
We need to deploy the pod's internal network so that containers on different nodes can communicate with each other. POD network is the overlay network between the worker nodes.
An overlay network is a virtual network of nodes and logical links, which are built on top of an existing network.
kubectl apply -f https://docs.projectcalico.org/manifests/calico.yaml
You need to run this on Master node
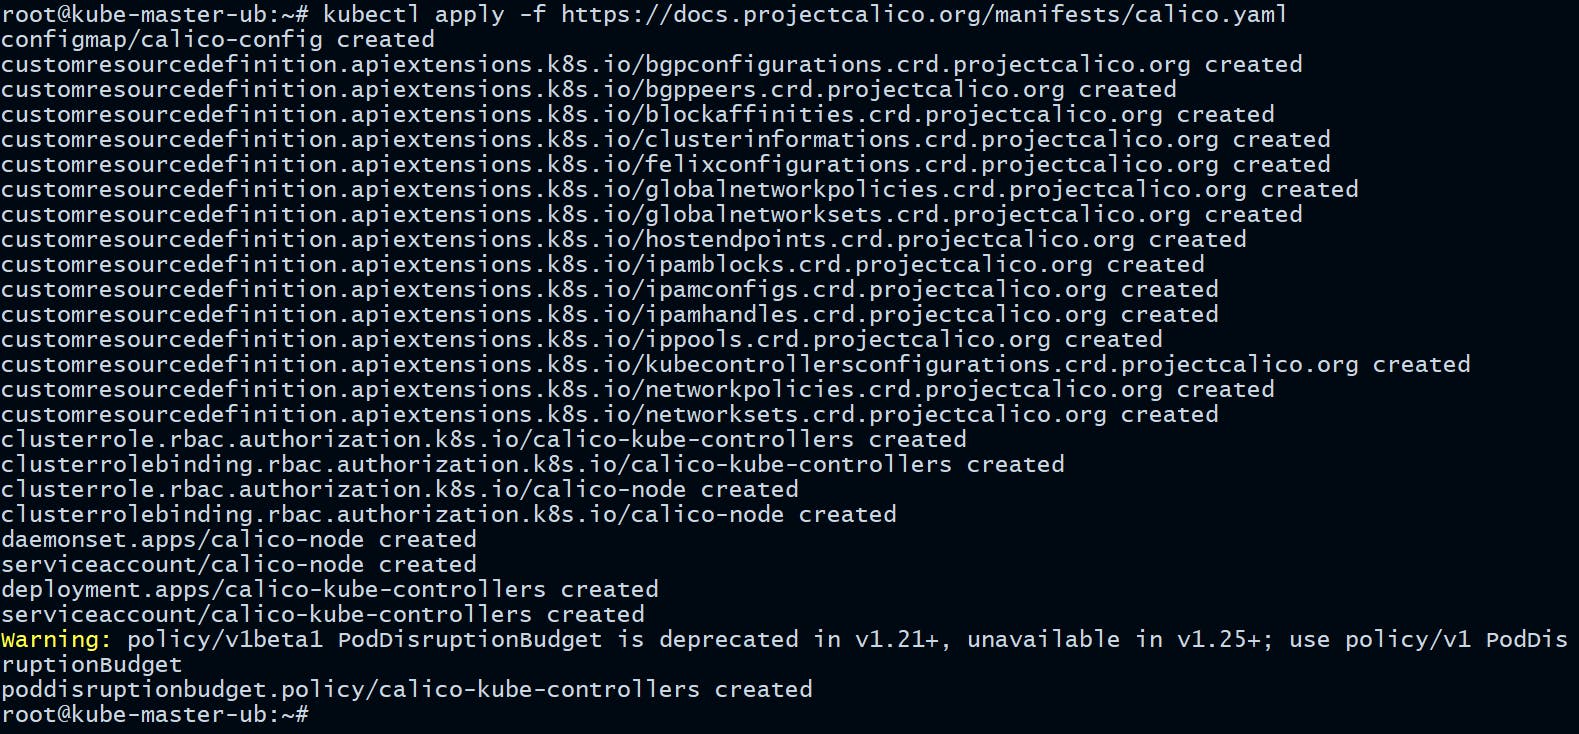
Calico is an open source networking and network security solution for containers, virtual machines, and native host-based workloads.
Now you can check the cluster status.
root@kube-master-ub:~# kubectl get nodes

Great! Our Control Plane Node aka Master node is now in ready state.
STEP 8: Configure Node IP
We need to configure node IP in /etc/default/kubelet file on all the individual nodes.
root@kube-master-ub:~# touch /etc/default/kubelet
root@kube-master-ub:~# echo "KUBELET_EXTRA_ARGS=--node-ip=172.24.24.100" > /etc/default/kubelet
On workers ->
root@kube-worker-ub1:~# touch /etc/default/kubelet
root@kube-worker-ub1:~# echo "KUBELET_EXTRA_ARGS=--node-ip=172.24.24.101" > /etc/default/kubelet

root@kube-worker-ub2:~# touch /etc/default/kubelet
root@kube-worker-ub2:~# echo "KUBELET_EXTRA_ARGS=--node-ip=172.24.24.102" > /etc/default/kubelet
STEP 9: Join Worker Nodes to Cluster
It's time to join our worker nodes to the cluster.
As indicated in Step 6 output, you can use the kubeadm join command on each worker node to connect it to the cluster.
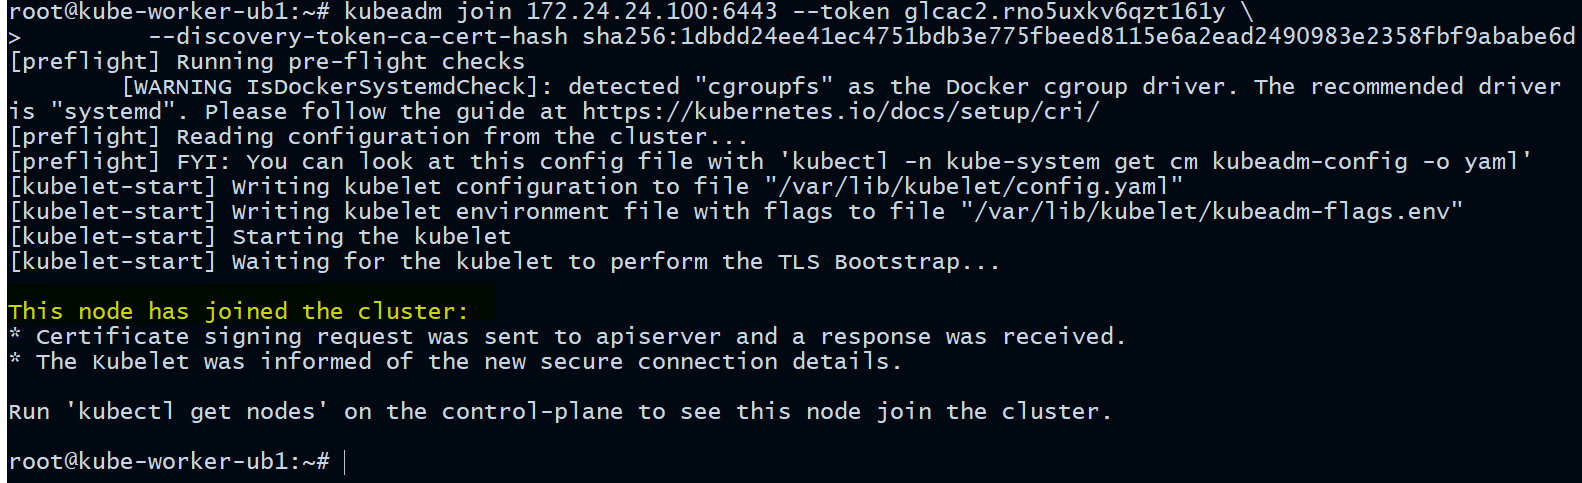
Run this command on each worker node.
root@kube-worker-ub1:~# kubeadm join 172.24.24.100:6443 --token glcac2.rno5uxkv6qzt161y --discovery-token-ca-cert-hash sha256:1dbdd24ee41ec4751bdb3e775fbeed8115e6a2ead2490983e2358fbf9ababe6d
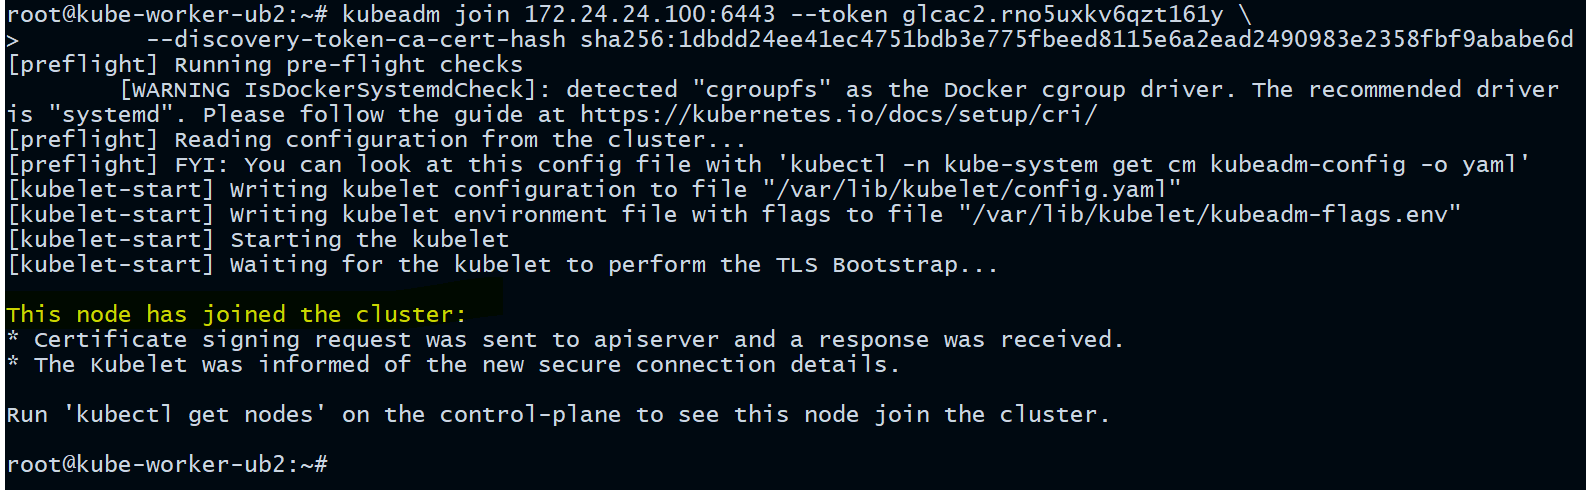
root@kube-worker-ub2:~# kubeadm join 172.24.24.100:6443 --token glcac2.rno5uxkv6qzt161y \
> --discovery-token-ca-cert-hash sha256:1dbdd24ee41ec4751bdb3e775fbeed8115e6a2ead2490983e2358fbf9ababe6d
Now check the cluster status again ->
root@kube-master-ub:~# kubectl get nodes

root@kube-master-ub:~# kubectl get nodes -o wide

Yo can see all the worker nodes has successfully joined the cluster and are ready to serve workloads.

If you somehow miss the output from the
kubeadm initcommand, nothing to worry about as you can always run following command to generate the kubeadm join token again.root@kube-master-ub:~# kubeadm token create --print-join-command kubeadm join 172.24.24.100:6443 --token ro4lyq.6qvceosrbgvn05jn --discovery-token-ca-cert-hash sha256:1dbdd24ee41ec4751bdb3e775fbeed8115e6a2ead2490983e2358fbf9ababe6d
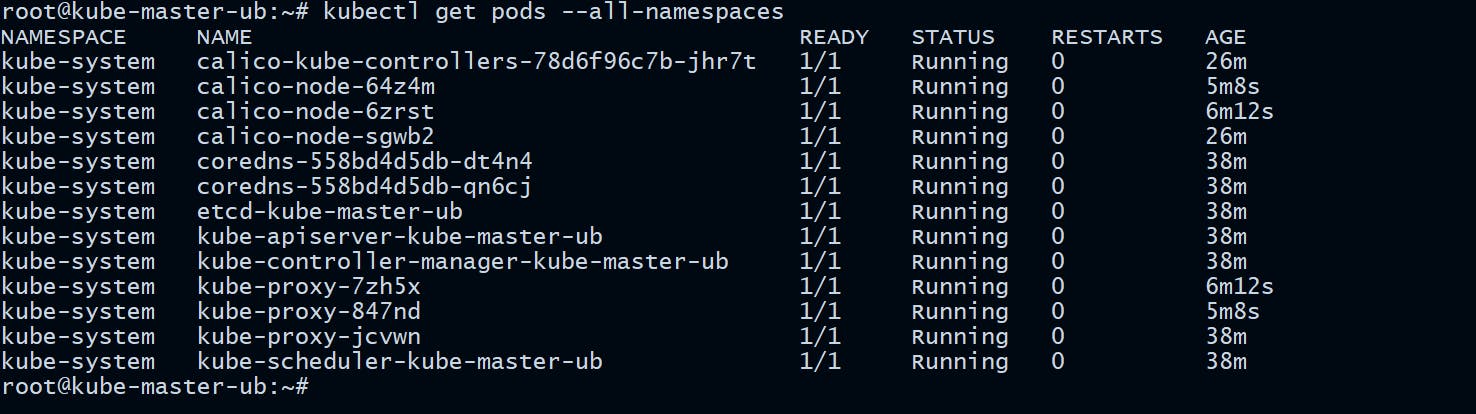
Verify all the pods running in all name spaces
root@kube-master-ub:~# kubectl get pods --all-namespaces
STEP 10: Test the cluster by creating a test pod
Run the following command to create a test pod on our Kubernetes cluster. Don't worry about the commands I am using here, we will learn about all these in detail in upcoming articles.
kubectl run my-web-pod --image=httpd --namespace=default --port=80 --labels app=frontend
Verify the pod status
kubectl get pods -o wide
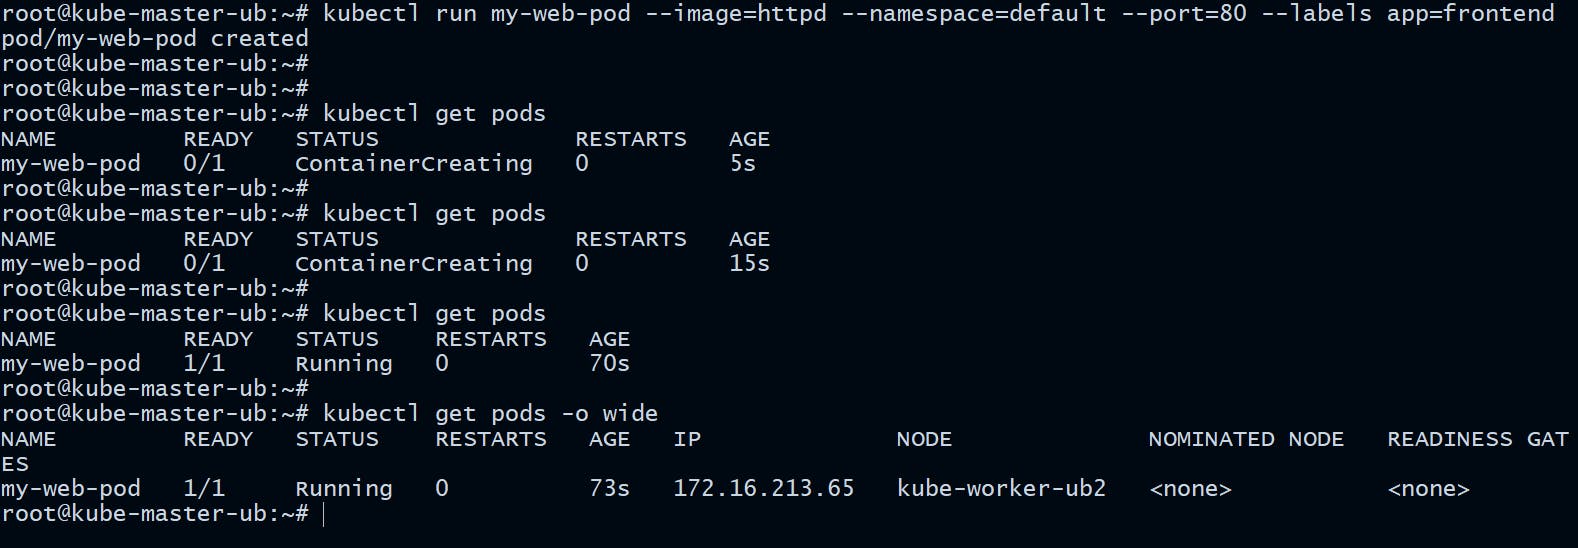
Congratulations!! Now you have a fully functional Production ready Kubernetes cluster up and running on Ubuntu server.
Hope you like the tutorial. Stay tuned and don't forget to provide your feedback in the response section.
Happy Learning!