


What are DaemonSets?
DeamonSets are like Replica Sets, as they help you deploy multiple instances of pod, but it runs one copy of your pod on each node in your Kubernetes cluster.
A DaemonSet ensures that all (or some) Nodes run a copy of a Pod. As nodes are added to the cluster, Pods are added to them. As nodes are removed from the cluster, those Pods are garbage collected. Deleting a DaemonSet will clean up the Pods it created.
Use cases of DaemonSets
Following are some typical use cases of DaemonSets:
When you would like to deploy a monitoring agent on each of your nodes in the cluster so you can monitor your cluster better. Then you don't have to worry about adding or removing monitoring agents from these nodes when there are changes in your cluster as the DaemonSet will take care of that for you. Such as Prometheus Node Exporter, Datadog agent etc.
A log collector running on each of your nodes in the cluster. For example logstash, fluentd.
A cluster storage daemon running on every nodes in the cluster. For example glusterd - ceph.
For networking solutions for example Weavenet would requires an Weavenet agent running on every node in the cluster.
kube-proxy is another good use case of DaemonSets. The reason behind that is that kube-proxy is needed on every node in the cluster to run IP tables, so that every node can access every pod no matter on which node it resides. Hence, when we make kube-proxy a daemonset and another node is added to the cluster at a later time, kube-proxy is automatically spawned on that node.
In a simple case, one DaemonSet, covering all nodes, would be used for each type of daemon. We can also configure multiple DaemonSets for a single type of daemon with different flags, memory, CPU, etc.
Kube-dnsresponsibility is to discover a service IP using its name and only one replica of kube-dns is enough to resolve the service name to its IP. Hence we make kube-dns a deployment, because we don't need kube-dns on every node.
How to schedule DaemonSet?
A Daemonset controller manages pods like Deployments, ReplicaSets, and StatefulSets.
Create a DaemonSet
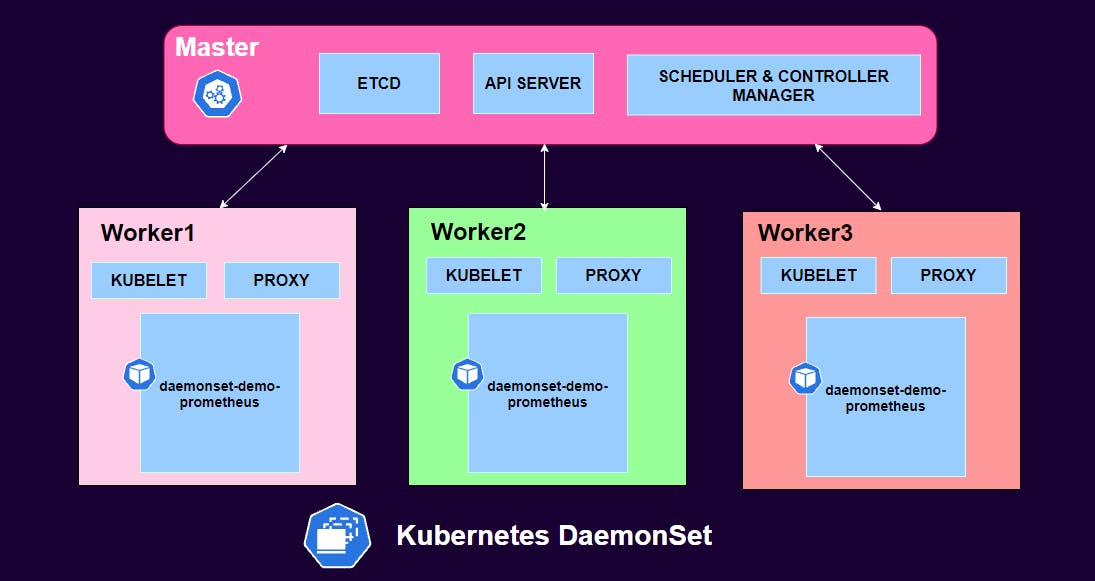
In this example, we’ll deploy prometheus node-exporter agent pod on each node of the cluster.
The following is an example of a DaemonSet manifest file:
root@kube-master:~/DaemonSet# cat daemonset_demo.yml
apiVersion: apps/v1
kind: DaemonSet
metadata:
  name: daemonset-demo-prometheus
spec:
  selector:
    matchLabels:
      tier: monitoring
      name: prometheus-exporter  # Label selector that determines which Pods belong to the DaemonSet
  template:
    metadata:
      labels:
        tier: monitoring # Pod template's label selector
        name: prometheus-exporter # Pod template's label selector
    spec:
      containers:
      - name: prometheus
        image: prom/node-exporter
        ports:
        - containerPort: 80
Let us understand what the above manifest file is all about.
- A DaemonSet named
daemonset-demo-prometheusis created, indicated by the metadata: name field. - DaemonSet's Pod is labelled
prometheus-exporterand tier asmonitoring. - The Pod's container pulls the latest
node-exporterimage. The container image is hosted by Container Registry.
Create DaemonSet by applying the manifest file using kubectl command.
root@kube-master:~/DaemonSet# kubectl apply -f daemonset_demo.yml --record
daemonset.apps/daemonset-demo-prometheus created
The
--recordflag will track changes made through each revision.
Verify the DaemonSet created :
root@kube-master:~/DaemonSet# kubectl get daemonsets daemonset-demo-prometheus -o wide
NAME                        DESIRED   CURRENT   READY   UP-TO-DATE   AVAILABLE   NODE SELECTOR   AGE     CONTAINERS   IMAGES               SELECTOR
daemonset-demo-prometheus   3         3         3       3            3           <none>          2m13s   prometheus   prom/node-exporter   name=prometheus-exporter,tier=monitoring
Get more details about the DaemonSet created :
root@kube-master:~/DaemonSet# kubectl describe daemonsets daemonset-demo-prometheus
Name:           daemonset-demo-prometheus
Selector:       name=prometheus-exporter,tier=monitoring
Node-Selector:  <none>
Labels:         <none>
Annotations:    deprecated.daemonset.template.generation: 1
                kubernetes.io/change-cause: kubectl apply --filename=daemonset_demo.yml --record=true
Desired Number of Nodes Scheduled: 3
Current Number of Nodes Scheduled: 3
Number of Nodes Scheduled with Up-to-date Pods: 3
Number of Nodes Scheduled with Available Pods: 3
Number of Nodes Misscheduled: 0
Pods Status:  3 Running / 0 Waiting / 0 Succeeded / 0 Failed
Pod Template:
  Labels:  name=prometheus-exporter
           tier=monitoring
  Containers:
   prometheus:
    Image:        prom/node-exporter
    Port:         80/TCP
    Host Port:    0/TCP
    Environment:  <none>
    Mounts:       <none>
  Volumes:        <none>
Events:
  Type    Reason            Age    From                  Message
  ----    ------            ----   ----                  -------
  Normal  SuccessfulCreate  2m52s  daemonset-controller  Created pod: daemonset-demo-prometheus-2l57n
  Normal  SuccessfulCreate  2m52s  daemonset-controller  Created pod: daemonset-demo-prometheus-8sgfk
  Normal  SuccessfulCreate  2m52s  daemonset-controller  Created pod: daemonset-demo-prometheus-ffbp6
Getting details pods in DaemonSet:
root@kube-master:~/DaemonSet# kubectl get pods -o wide
NAME                              READY   STATUS    RESTARTS   AGE    IP                NODE           NOMINATED NODE   READINESS GATES
daemonset-demo-prometheus-2l57n   1/1     Running   0          5m1s   192.168.221.241   kube-master    <none>           <none>
daemonset-demo-prometheus-8sgfk   1/1     Running   0          5m1s   192.168.194.4     kube-worker1   <none>           <none>
daemonset-demo-prometheus-ffbp6   1/1     Running   0          5m1s   192.168.161.240   kube-worker2   <none>           <none>
You can see from the output above, there are 3 pods deployed. One on each the master and the worker nodes. Here the DaemonSet made sure we had one pod per node without using any affinity rules.
Delete a DaemonSet
Like all other Kubernetes object DaemonSet also can be deleted either by using the same manifest file it was created with or by using the kubectl command.
root@kube-master:~/DaemonSet# kubectl delete -f daemonset_demo.yml
daemonset.apps "daemonset-demo-prometheus" deleted
root@kube-master:~/DaemonSet# kubectl delete daemonsets daemonset-demo-prometheus
daemonset.apps "daemonset-demo-prometheus" deleted
How to update DaemonSets?
DaemonSet can be updated by changing following specifications:
- Pod specification
- resource requests
- limits
- labels
- Annotations
We can use either of two update strategies to update a Daemonset:
RollingUpdate - This is the default strategy and will be applied upon configuration change. It automatically deletes and recreates the DaemonSet pods.
OnDelete - When using this strategy Kubernetes does not automatically delete the DaemonSet pods and recreate them in case of configuration changes. You have to delete pods manually, and then controller will create a new pods with new changes.
How Daemon Pods are scheduled
A DaemonSet ensures that all eligible nodes run a copy of a Pod. Normally Kubernetes scheduler decides the node that a Pod runs on. However, DaemonSet pods are created and scheduled by the DaemonSet controller instead.
But that causes following issues:
Inconsistent Pod behavior: Normal Pods waiting to be scheduled are created and remain in Pending state, but DaemonSet pods are not created in Pending state. This is confusing to the user.
Pod preemption is handled by default scheduler. When preemption is enabled, the DaemonSet controller will make scheduling decisions without considering pod priority and preemption.
What is the Solution?
ScheduleDaemonSetPods allows you to schedule DaemonSets using the default scheduler instead of the DaemonSet controller, by adding the NodeAffinity term to the DaemonSet pods, instead of the .spec.nodeName term.
The default scheduler is then used to bind the pod to the target host.
Following manifest file creates a pod using node affinity rules.
apiVersion: v1
kind: Pod
metadata:
  name: web-servers
spec:
  affinity:
    nodeAffinity:
      requiredDuringSchedulingIgnoredDuringExecution:
        nodeSelectorTerms:
        - matchExpressions:
          - key: workload
            operator: In
            values:
            - staging
  containers:
  - name: nginx
    image: nginx
    imagePullPolicy: IfNotPresent
If you observe above manifest file we have a Pod scheduled with requiredDuringSchedulingIgnoredDuringExecution type Node Affinity and the expression key-value as workload: staging. This means that the pod will only be scheduled on a node that has a workload=staging label.
Taints and Tolerations
Daemon Pods respect taints and tolerations. The node.kubernetes.io/unschedulable:NoSchedule toleration is added automatically to DaemonSet Pods. The default scheduler ignores unschedulable Nodes when scheduling DaemonSet Pods.
Communicating with Daemon Pods
There are different ways we can communicate with pods created by DaemonSets.
Push : Using this way the pods can be configured to send information such as stats database or monotoring service to other services. They do not have clients.
NodeIP & Known Port : Pods can be reached via their respective node IPs using
hostPort. Users can use the known ports and the node IP to communicate with the pods.DNS : We can create a headless service with the same pod selector, and then discover DaemonSets using the endpoints resource or retrieve multiple A records from DNS.
Service : We can create a service with the same Pod selector, and use the service to reach a daemon on a random node. (No way to reach specific node.)
Summary
DaemonSets are very useful when you want to deploy ongoing background tasks that you need to run on all or certain nodes without any user intervention. Example of such tasks are log collection daemons like logstash, storage daemons like ceph, and node monitoring daemons like prometheus node-exporter etc.
This is all about Kubernetes DaemonSet.
Hope you like the tutorial. Stay tuned and don't forget to provide your feedback in the response section.
Happy Learning!